
Post Processing Jobs
If you want to get access to all IXOPAY platform features you need to upgrade your plan. Please contact our Support Team in the IXOPAY Customer Experience Portal for more information.
With IXOPAY platform’s Post-Processing Job Engine, you can automate ETL (Extract, Transform, Load) Jobs dealing with Transactions.
It can be used for a multitude of use cases, such as invoicing, settlement processing, automated Excel/ CSV reports, or data transfer to any third party systems (e.g. your ERP or bookkeeping system). Some of them are described by way of example in subsections.
Basics
First, we want to explain some terms which are necessary to understand the further documentation.
Job Type
A job type defines the kind of job and needs to be configured before execution. In general, the type is just an empty “Container” for which you configure the desired steps to be executed.
Each job type contains one or more steps for “Collecting” information (e.g. fetch Transaction based on the configured criteria), “Processing” the collected data (e.g. calculate sum of Transaction values or Fees, those are written to so-called “Job Line Items”) and “Exporting” data (e.g. writing the Transaction data or the processing results to files or external systems).
Job Schedule
Once a job type is configured, a job schedule needs to be created to define parameters. If the parameters match the actual jobs get executed in the IXOPAY platform. Within the schedule you define:
- in which intervals the job gets triggered (e.g. weekly, or monthly, or every 3 days, etc. or manually)
- for which related entity (Merchant, (Sub-)Tenant, Provider) the job gets executed.
Through this related entity, the system knows which Transactions it shall consider during the Collecting phase. E.g. the Schedule is defined for Merchant “ABC”, then the job will only consider Transactions of this particular Merchant.
Job
The job is the final executed job based on your configured job type. Every time the schedule criteria matches (e.g. “every Monday at 07:00”), the system creates a new job and runs the steps configured in the particular job type.
A job (after fully processed) will contain the following elements among other information (see Example Job):
- Transactions: all Transactions that were collected through the “Collecting” steps
- Line Items: these are the results from the “Processing” steps (e.g. sum of Transaction Fees, split by certain criteria, etc.)
- Documents: these are any files that were generated through the “Exporting” steps
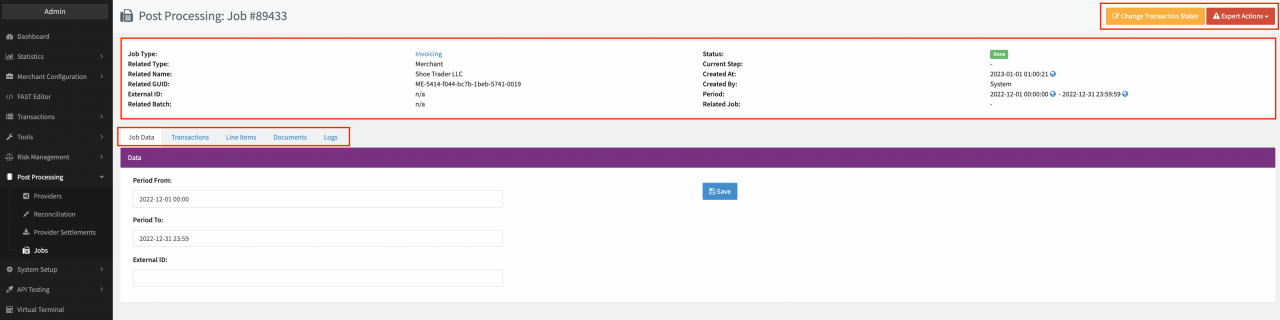 Example Job
Step-By-Step Guide
First of all you need to create and configure a Job Type to be able to run Post Processing Jobs in the IXOPAY platform:
Job Type
Follow these steps to set up a new Job Type :
- Navigate to the System Setup section, sub-section Job Configuration
- Select + New Job Type - you can already pre-select the (Sub-)Tenant for which the new job type should be created (see Job Type Overview)
- Fill in the Job Type Name and “owning” (Sub-)Tenant and click + Create (see Create new Job Type)
- Optional you can select a predefined Job Type Template to be edited (see Job Type Template)
You are redirected in the configuration view for this Job Type in which you can configure the different tabs (Job Data, Collecting, Processing, Exporting) or save the configured Job as a Job Type Template with + Save as Template (see Create Job Type Template). The Job Type will be shown in the the Job Type overview of the “owning” tenant and can be edited or archived there anytime.
In the next section you will find details about the configuration, namely Job Data and Step Configuration, or you can jump directly to the Job Schedules, which is the next logical step to run Post Processing Jobs in the IXOPAY platform.
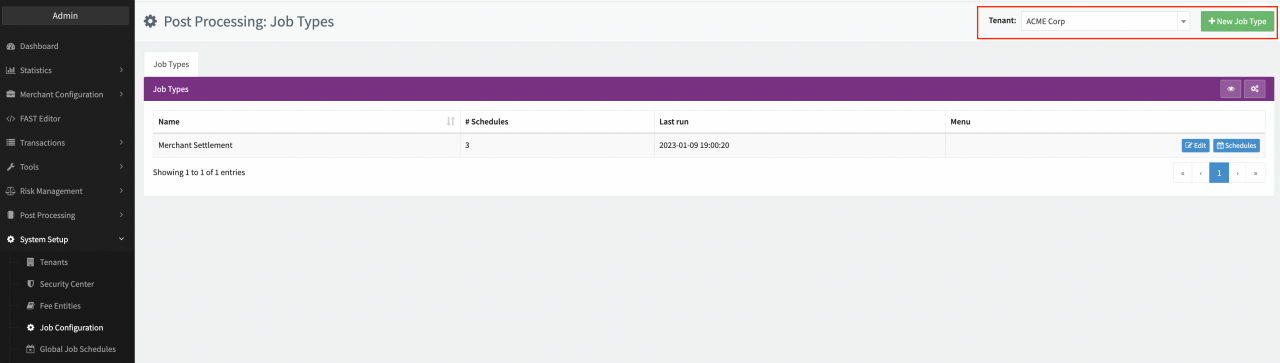 Job Type Overview
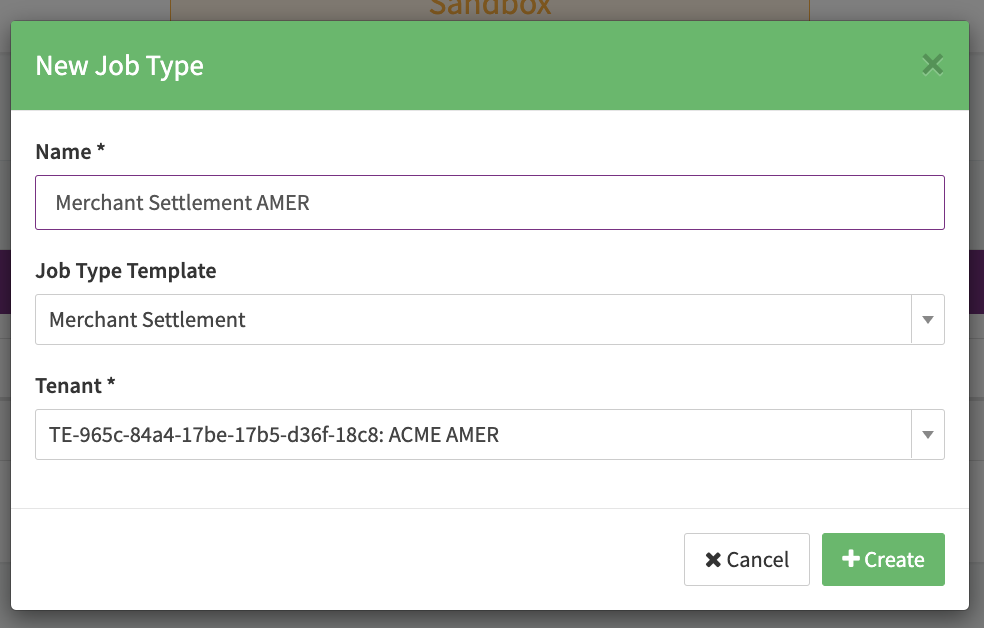 Create new Job Type
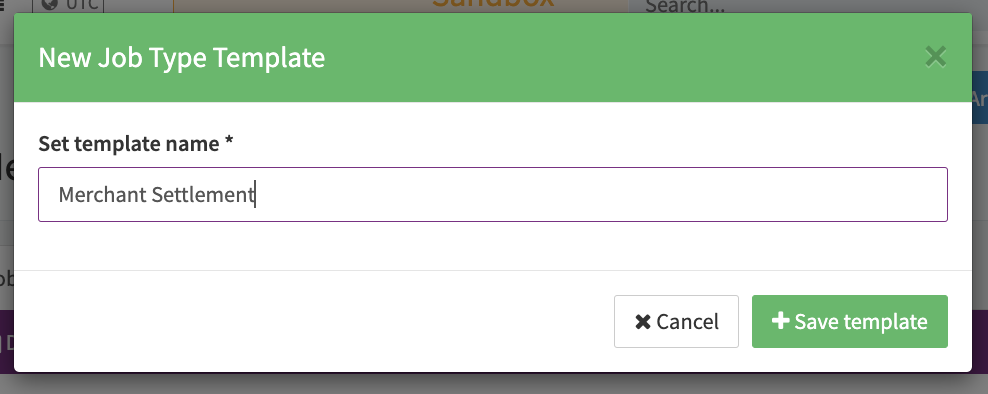 Create a Job Type Template
Job Types can only be scheduled on entities within the hierarchy of the entity the Job Type was configured for: E.g. Job Type is defined for Tenant ACME Corp. The Job Type can only be scheduled on Sub-Tenants, Provider, Merchants created under the ACME Corp tenant.
Scheduled Job Types cannot be archived, first you need to delete all schedules before being able to archive the Job Type.
With the Permission postprocessing.job-config.templates.* Job Type Templates can be created and found in the Job Type Templates Tab where they can be made available for Sub-Tenants, enabled /disabled, edited or deleted.
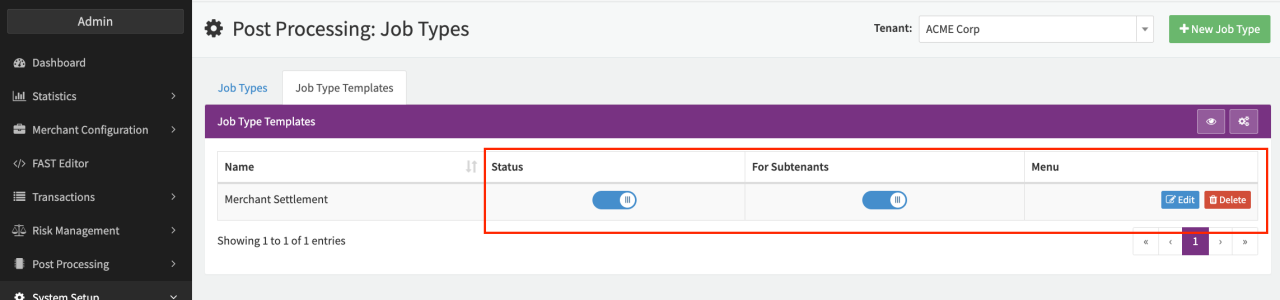 Job Type Templates
Job Data
The Job Data section is the first tab in the Job Type Configuration. Here you can configure fields to be available on each executed job to be filled — so basically some base data on head-level for each job. This is only the declaration of the data fields, not the values itself. E.g. you can define a job shall contain a field for your “Internal Reference Number” so you would configure a “TextParam”, which can then be filled individually for each triggered job (see executed Job).
The available field types split into primitive types and complex types.
The primitive types are:
- TextParam : a text input field
- NumericParam : an input field for numbers
- BooleanParam : a field which can either be “on” or “off” (resp. “Yes” or “No”)
- SelectParam : a dropdown field which allows to select a pre-defined value
- MultiSelectParam : same as SelectParam, but allows multiple values to be selected
- DateParam : a field containing a Date value
Each field contains the following generic configuration parameters among further self-explanatory parameters:
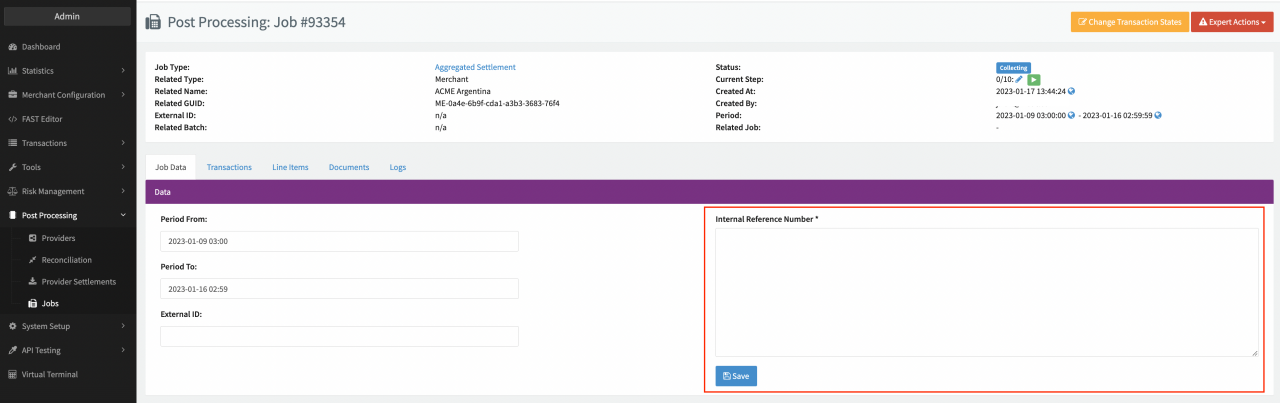 Executed Job
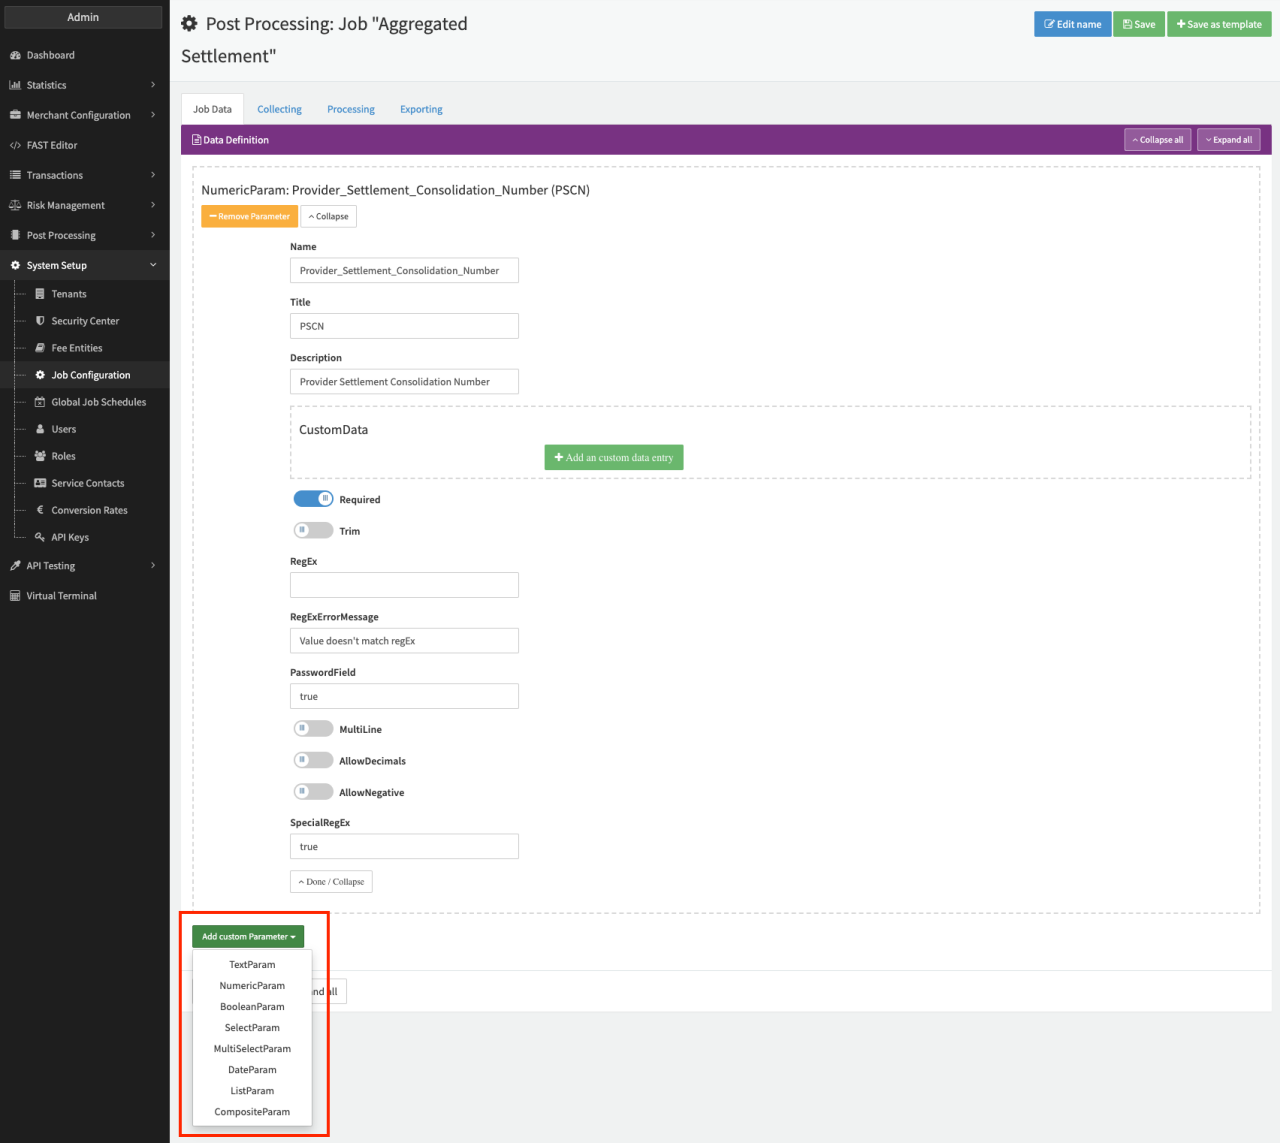 Primitive Types
The complex types are:
- CompositeParam : A collection of multiple primitive fields, which shall be grouped together or can be used as a line-based group of fields for the ListParam
- ListParam : A list of primitive values, or a list of CompositeParam.
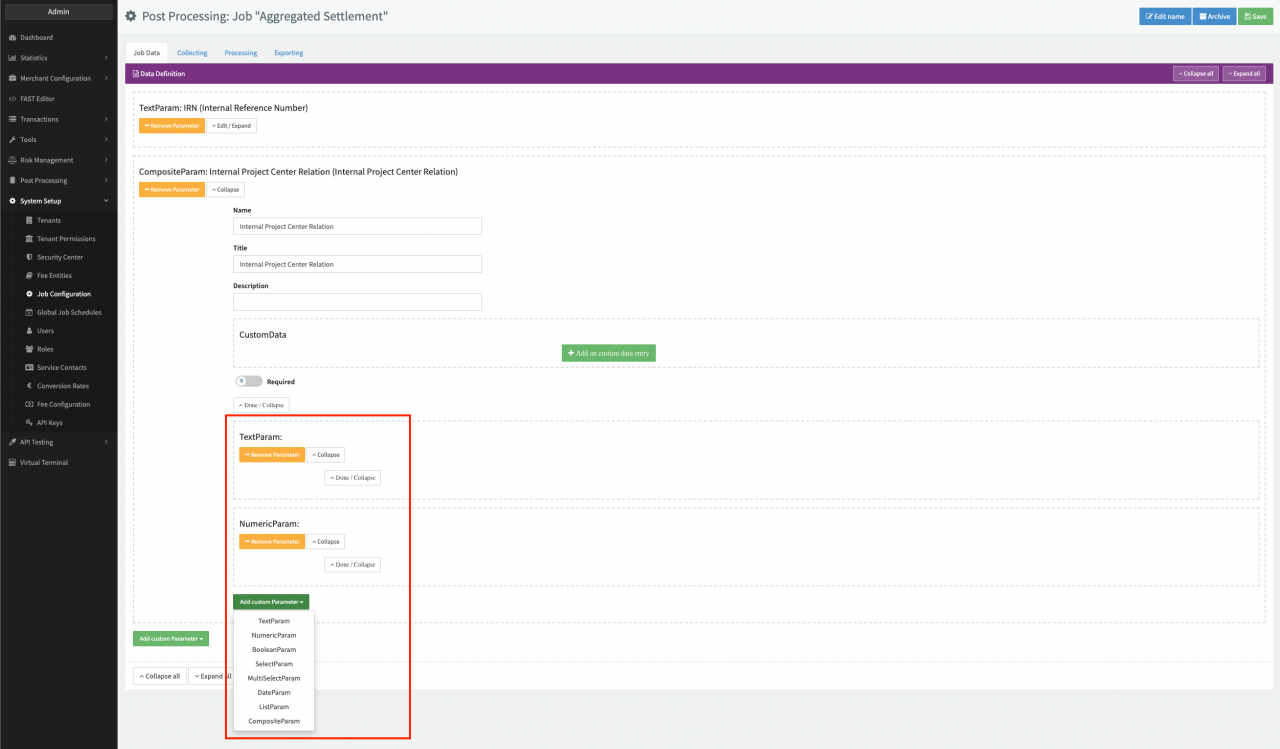 Complex Types
Step Configuration
Each job type contains one or more steps for “Collecting” information (e.g. fetch Transaction based on the configured criteria), “Processing” the collected data (e.g. calculate sum of Transaction values or Fees, those are written to so-called “Job Line Items”) and “Exporting” data (e.g. writing the Transaction data or the processing results to files or external systems).
For each step there are some generic configuration parameters you can configure such as:
- Descriptive name : Description of the individual configured step
- Enable/Disable step: Disabled steps will not be considered in executed Post Processing Jobs
- Run Constraints : Define constraints, which must be met in order for the step to be executed.
Matching Type: Define if one, all or none of the constraints must be met
- Constraint: Define the constraint quadruple of Comparison (see Comparison options table), Key or Data field, Comparator (see Comparator table) and Value
Expand/Collapse to see the configuration details for each step or Remove/Duplicate the step.
Other configuration details are specific per Collecting, Processing and Exporting step.
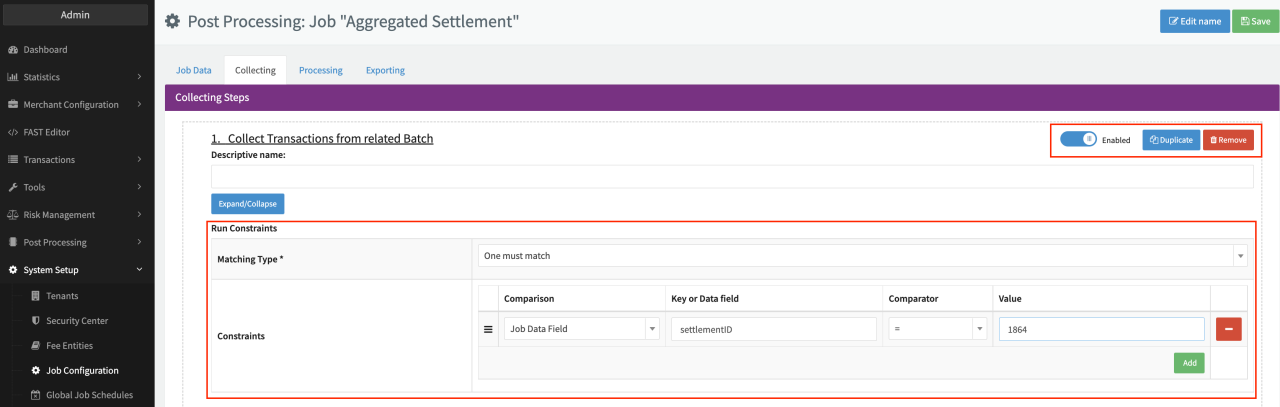 Generic configuration parameters steps
Collecting Steps
Collecting Steps are the first phase of a job. They are supposed to collect all data (Transactions or top-level data), that are necessary for further processing the job. You can add and configure as many Collecting Steps as you want. Below you can find a definition and key configuration parameters for every step.
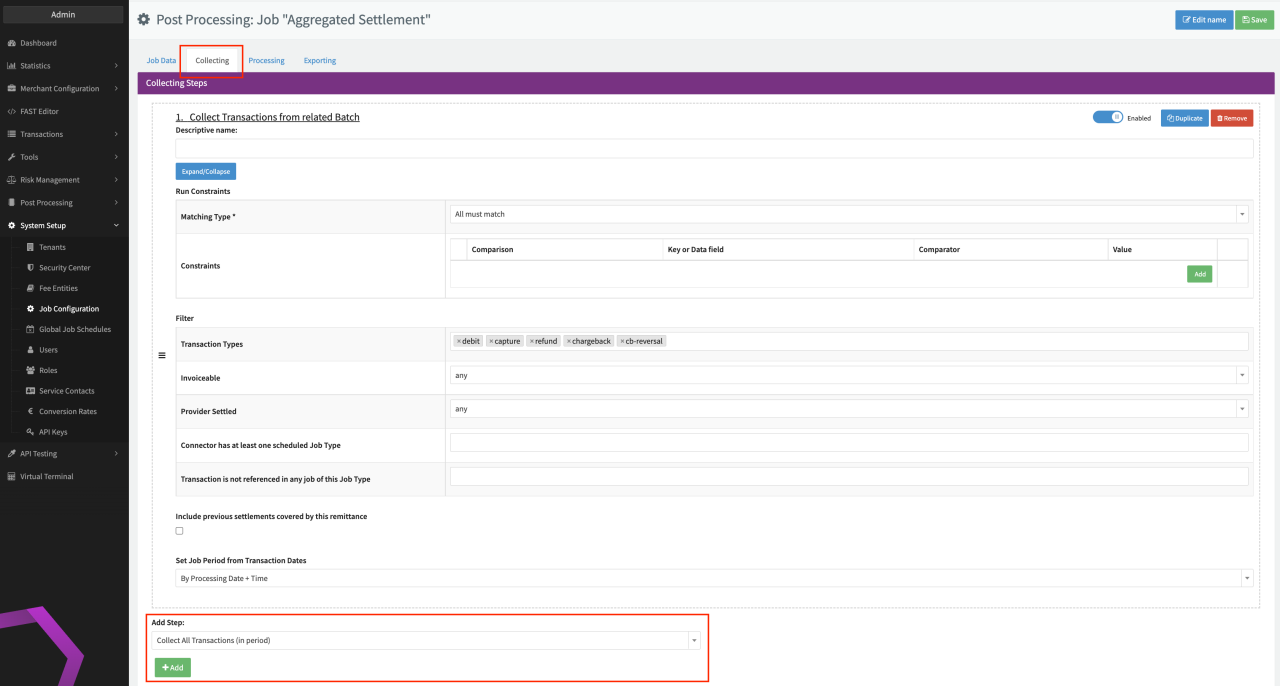 Collecting Steps
Files are retained for 12 months and permanently deleted thereafter.
Processing Steps
Processing Steps are the second phase of a job. These steps define calculations done using the collected data (Transactions) from the collecting tab (e.g. summing up volumes, fees etc.). Steps in this phase also include copying of Job line items from the related jobs (e.g. Provider settlement). Every Processing Step creating a job line item , will have a configuration field (or multiple) for Item Type to configure the name resulting line item to be referenced in the Exporting step.
Many steps have configuration parameters for Line Item Grouping to define how data should be grouped. E.g. you could sum up all Transaction volumes, and then group it by payment method and Provider. You can add and configure as many Processing Steps as you want. Below you can find a definition and key configuration parameters for every step.
Exporting Steps
Exporting Steps are the last phase of a job. These steps define the creation of reports and files using the collected and processed data (Transactions) from previous steps. Further, you can define various exporting steps to 3rd party system (e.g. your ERP or bookkeeping system).
Steps in this phase can be grouped into 3 categories:
- File Creation Steps
- Job Steps
- Upload/Export Steps
You can add and configure as many Exporting Steps as you want. Below you can find a definition and key configuration parameters for every step.
File creation
Files are retained for 12 months and permanently deleted thereafter.
Job steps
Upload/Export Steps
Job Schedules
Once a job type is configured, you must schedule this job on the designated related entity so the job “knows” which scope of Transactions shall be considered for processing. The related entity can either be a Merchant, a Provider, or a Tenant:
- Merchant: Navigate to the Merchant Overview , select the (Sub-)Tenant for which the desired Merchant is configured and click Job Schedules from the More drop-down of the desired Merchant
- Provider: Navigate to the Post Processing section, sub-section Providers. Select the (Sub-)Tenant for which the desired Provider is configured and click Schedules for the desired Provider in the Provider Overview
- Tenant: Navigate to the System Setup section, sub-section Tenants. Click Jobs Schedules for the desired (Sub-)Tenant in the Tenant Overview
You are redirected in the Job Schedule Overview for the related entity. Follow these steps to create a new schedule:
- Select + Create new Schedule in the Job Schedule Overview of the related entity (see Job Schedule Overview)
- Select the Job Type to be scheduled from the drop-down
- Select the Schedule: Either manual (option Manual trigger only) or using a Cron Expression (similar to Unix CronJobs, in UTC). The Cron Expression can be generated using the build-in wizard. For Provider Job Schedules there is the additional option to trigger jobs on incoming Provider settlement processing. This automatically sets a link between the job and the Provider settlement entity.
- Using the IXOPAY Account Updater, there is also the option to trigger jobs on Account Update
- Select the Job Period incl. Offset (from execution date): The job period is important for the “Collecting” steps, so the job knows Transactions from which time frame should be collected during execution. It always considers the full period interval before the current execution (day, week, month). Example : A period of “1 month” would always consider the full previous month, regardless if the job was triggered on the 1st, 2nd, or any day of the current month. However, the period also allows you to configure offsets: You execute a job weekly on Wednesday and want to consider the Transactions of the calendar week before (Monday to Sunday), then set the period to “7 days”, and the offset to “2 days”. (Wednesday -> full day before is Tuesday, minus 2 days is Sunday, period of 7 days means Monday to Sunday). The resulting period (start date/time and end date/time) is automatically stored in the job’s base data once the Schedule triggers
- Select + Create to save the schedules
- Edit the Job Schedule to assign Connectors for the Job Schedule (in case Processing Steps using Connector Line Items will be used)
- Enable the Job Schedule in the Job Schedule overview - by default new Job Schedules are disabled.
You can disable, edit or delete Job Schedules anytime.
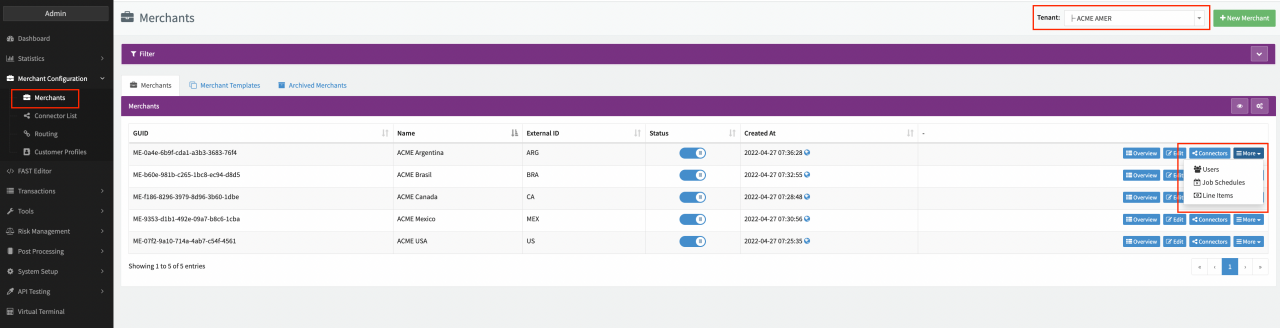 Merchant Job Schedule
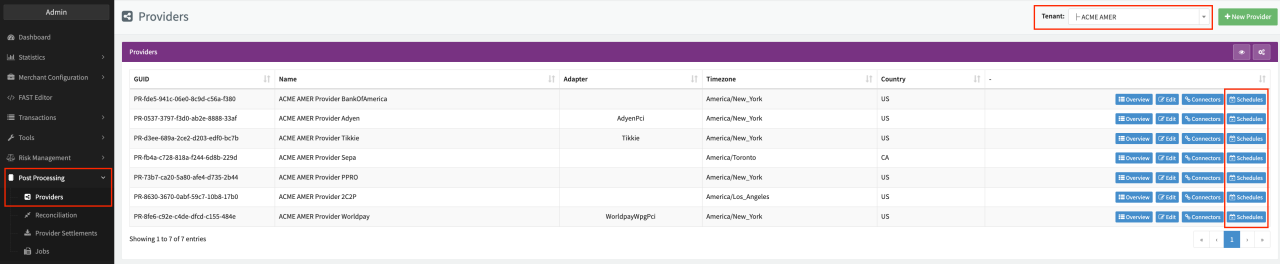 Provider Job Schedule
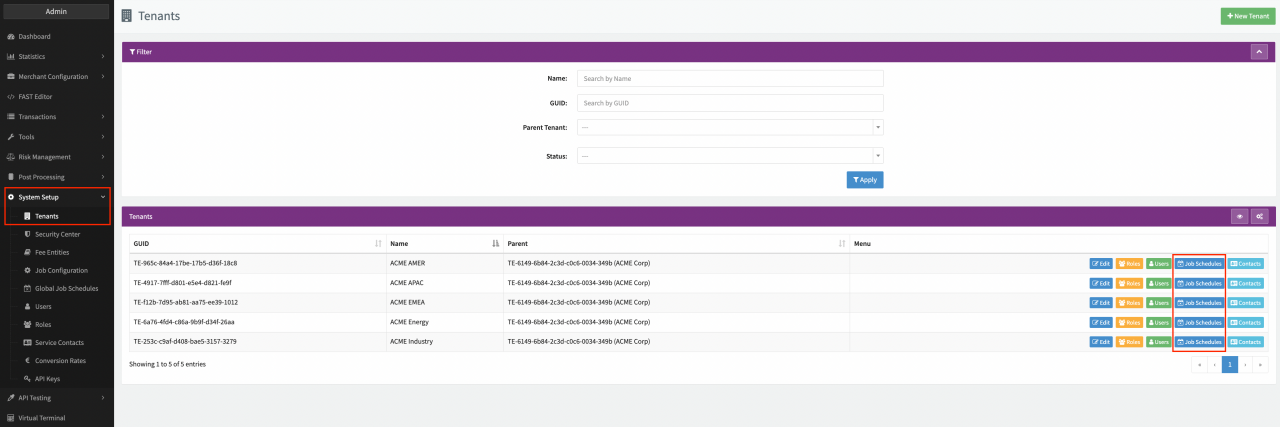 Tenant Job Schedule
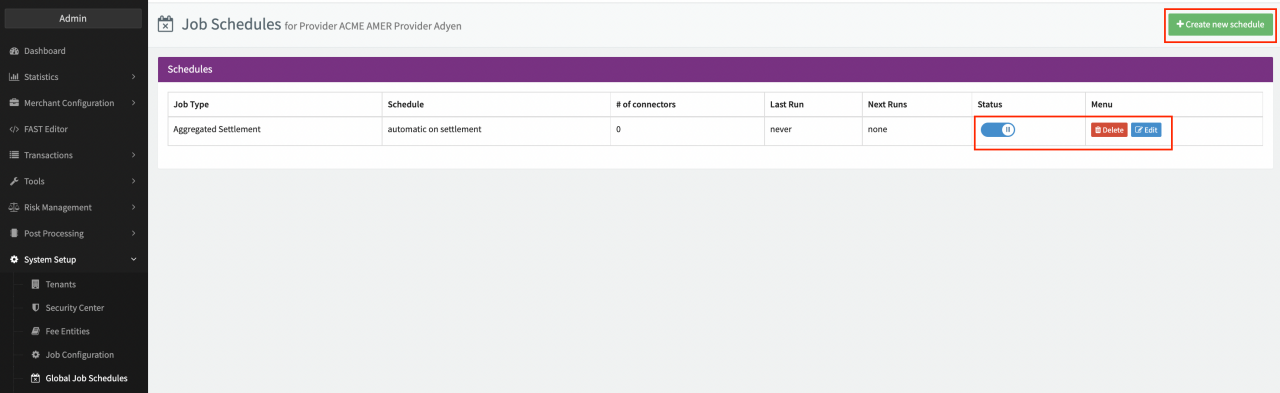 Job schedule overview
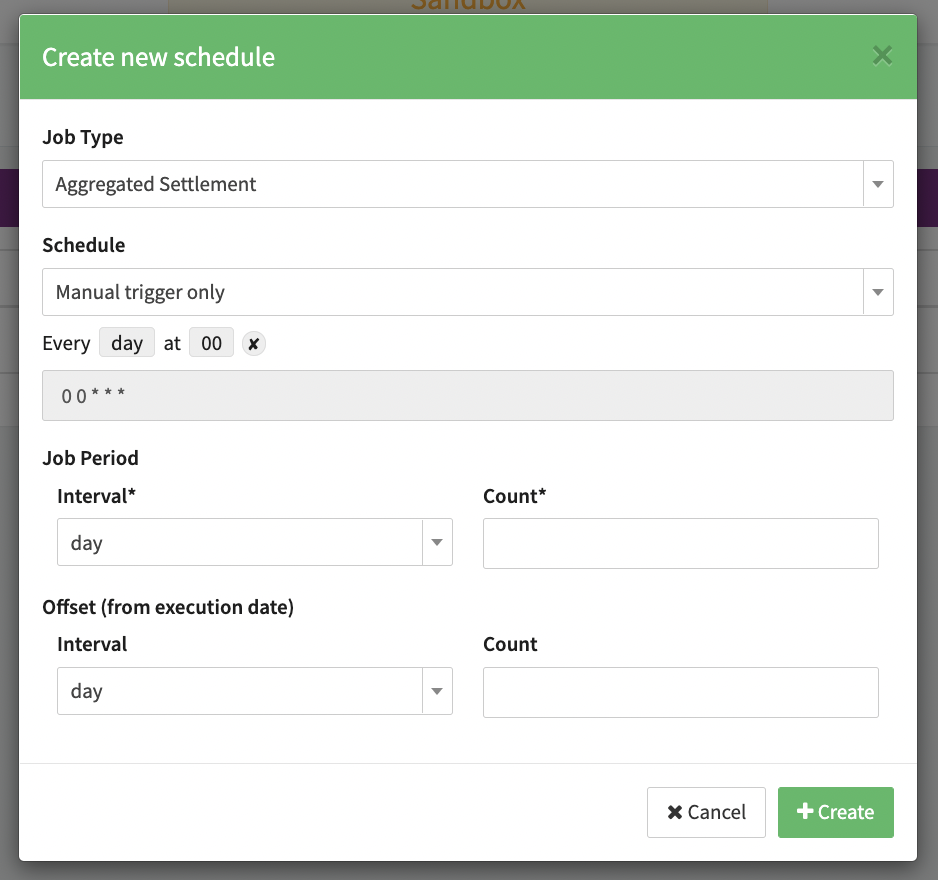 Create new schedule
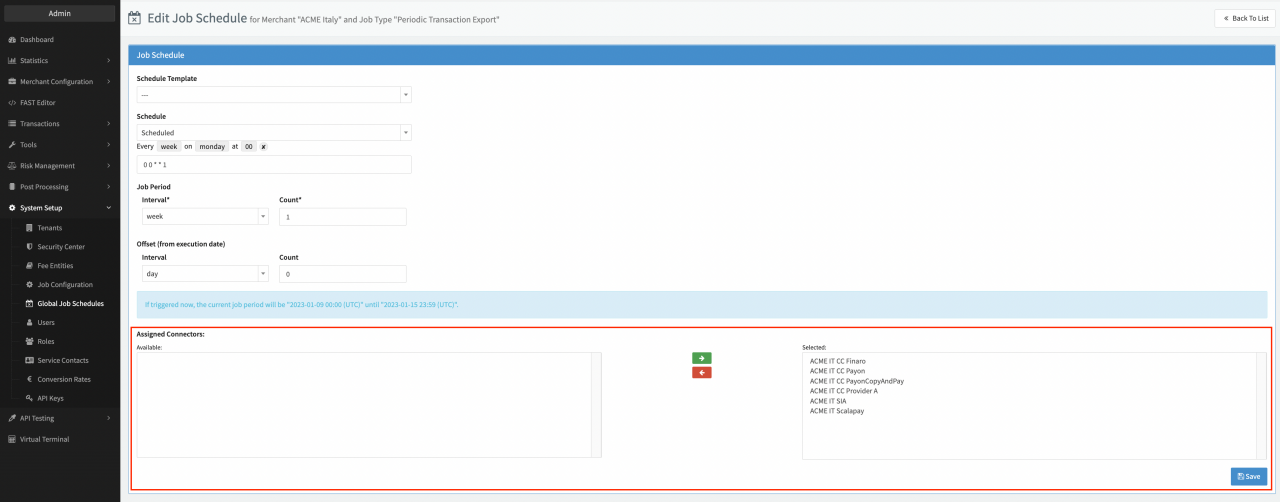 Assign Connectors
The configuration view for the Job Schedules will always highlight the Global Schedule navigation section independently of the related entity. The related entity can be found in the title of the job schedule overview.
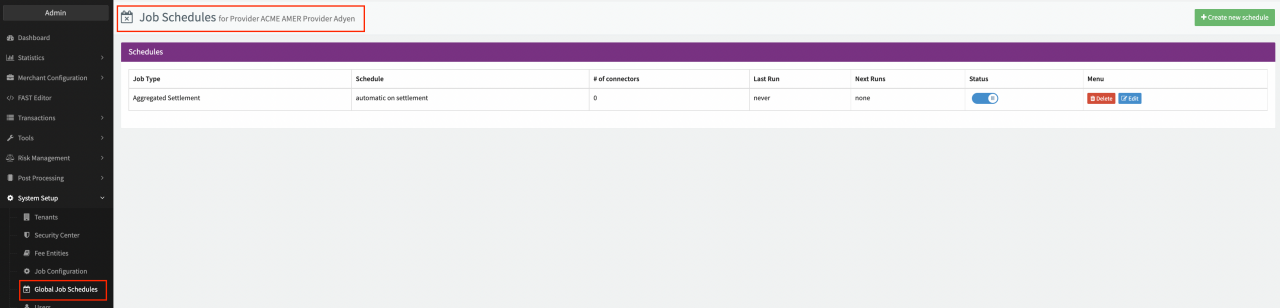 Global Job Schedules: related entity
The schedule option On Provider Settlement triggers Post Processing jobs only once the Settlement is completely processed and has no conflicts.
Jobs
A Job is the executed job based on your configured job type. Every time the schedule criteria matches (e.g. “every Monday at 07:00”), the system creates a new job and runs the steps configured in the particular job type.
The executed job itself can be found in the Job Overview.
- Navigate to the Post Processing section, sub-section Jobs.
- Filter the Jobs Overview according to your criteria, for example:
- Filter for Status “Paused” to
- Bulk continue all paused jobs with the multi-selection option (see Bulk Continue) or
- Select Details to navigate to the Job Details of an individual Job
- Select Continue Job
- Leave a Comment (see Confirmation)
- Filter for Status “Conflicted” and
- See in the Jobs Overview the in which phase (“Collecting”, “Processing”, Exporting”) the Job became conflicted
- Select Details to navigate to the Job Details of an individual Job. The General Information shows the exact step the Job became conflicted. Hint: if configured the descriptive name will be shown additionally to the step number
- Filter for Status “Paused” to
- Customize and sort the Job Overview to contain all desired information, for example:
- Job ID
- Related entity
- Job Type
- Job Period
- Job Status (Collecting, Processing, Exporting, Paused, Done)
-
of Tx
- …
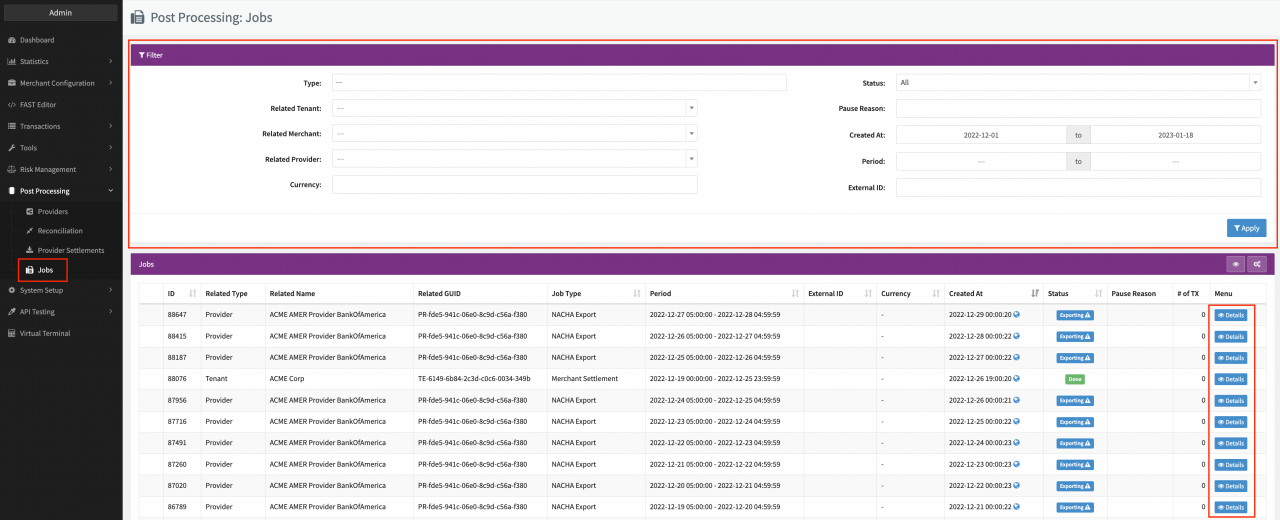 Jobs Overview
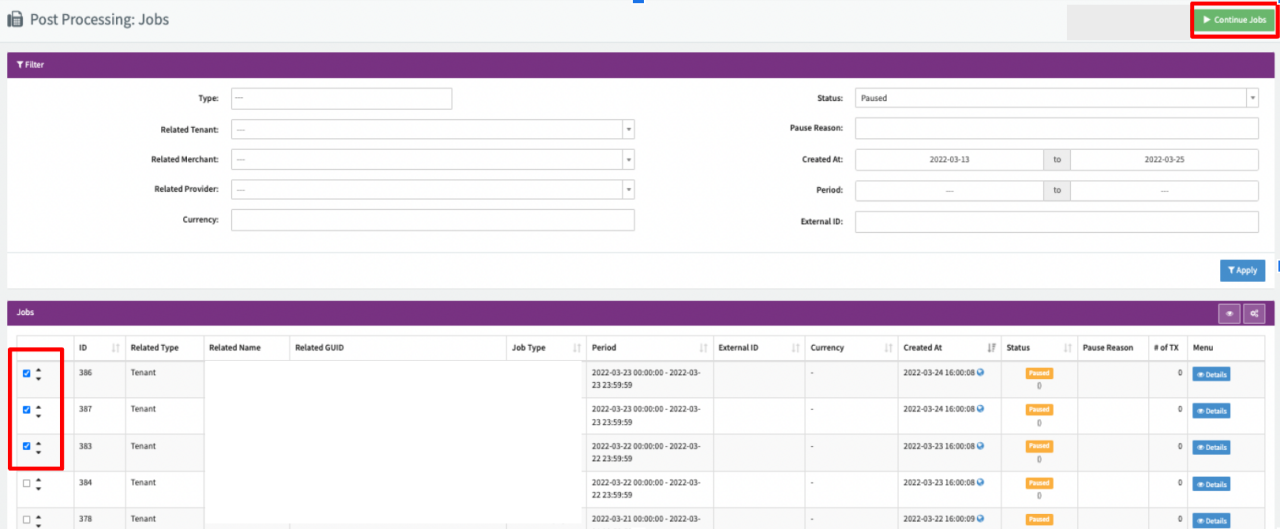 Bulk Continue
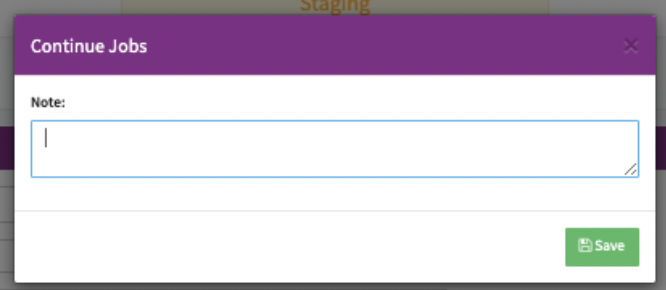 Confirmation
You can search for a specific Job ID by using the Search Bar in the Top Bar of the User Interface. For conflicted Jobs there is also the option to configure Alerts.
Job Details
The Job Details of a executed Post Processing Job contain several different sections and tabs:
- General information
- Job Data
- Transactions
- Line Items
- Documents
- Logs
- Action Buttons
General Information
This section contains information about the Job Typ, related entity, Status / Current Step and Job Period
Job Data
This section contains the Job Period and External ID as well as the in the Job Type configured Job Data fields. This data can be edited and saved.
Transactions
This tab contains the collected Transactions from the Job Types configured Collecting steps. You can filter the Transaction list and remove Transactions if necessary before continuing a paused Job (see Transaction Tab).
Line Items
This tab contains the created or copied Line Items from the Job Types configured Processing steps. You can edit and confirm the changes to line items if necessary before continuing a paused Job (see Line Item Tab and Confirmation Line Item Change)
Documents
This tab contains all created documents for this job. Which kind of documents will be created is configured in the Job Types Exporting steps. You can also upload files manually and decide per file individually if it should be visible to Merchant Users. Furthermore you can download the documents to your local drive.
Logs
This tabs contains any errors occurred during job execution. Further any Note inserted when manually continuing a job is logged in this tab as well.
Action Buttons
With the Action Buttons you can perform several different actions on the Job or Transactions collected by the Collecting steps.
- Change Transaction States : Manually change the Incoming / Outgoing Settlement State incl. change date/time (see Change Transaction States)
- Expert Actions : Reset Line Items & Recalculate, Recalculate Transaction Fees, Resolve Conflicts
- + Add Pause Reason , Cancel Job , Continue Job: Manually change the Job state
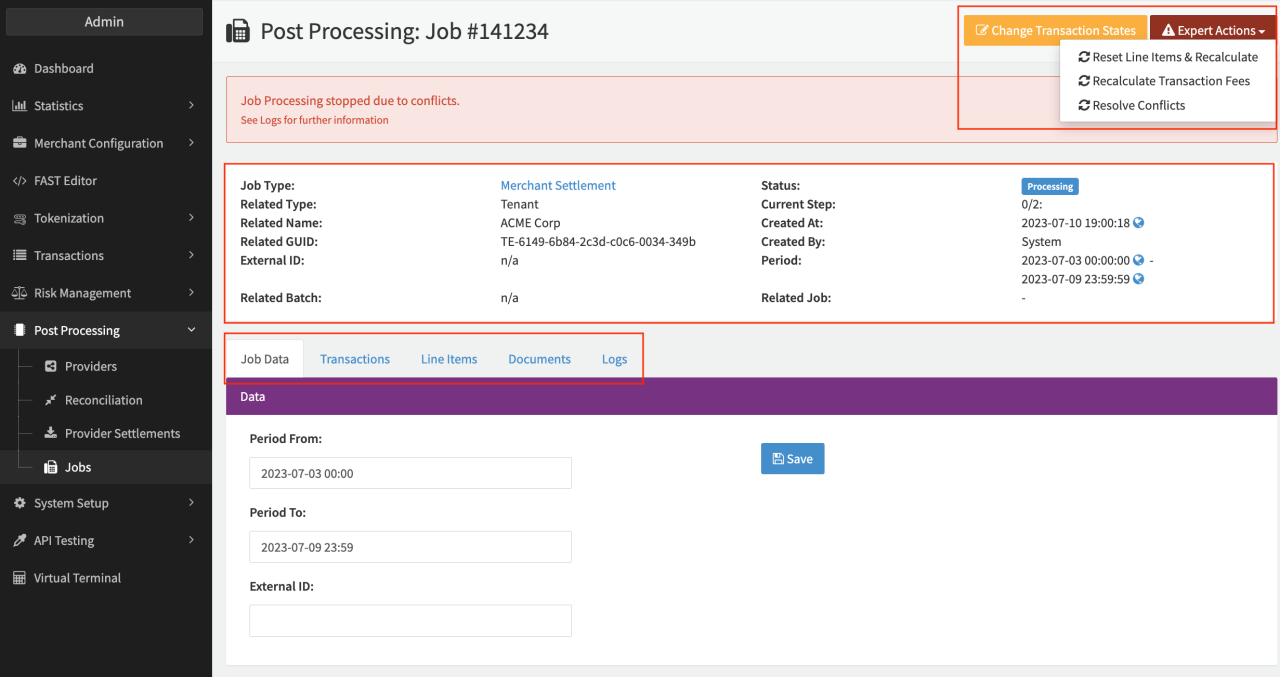 Job Details
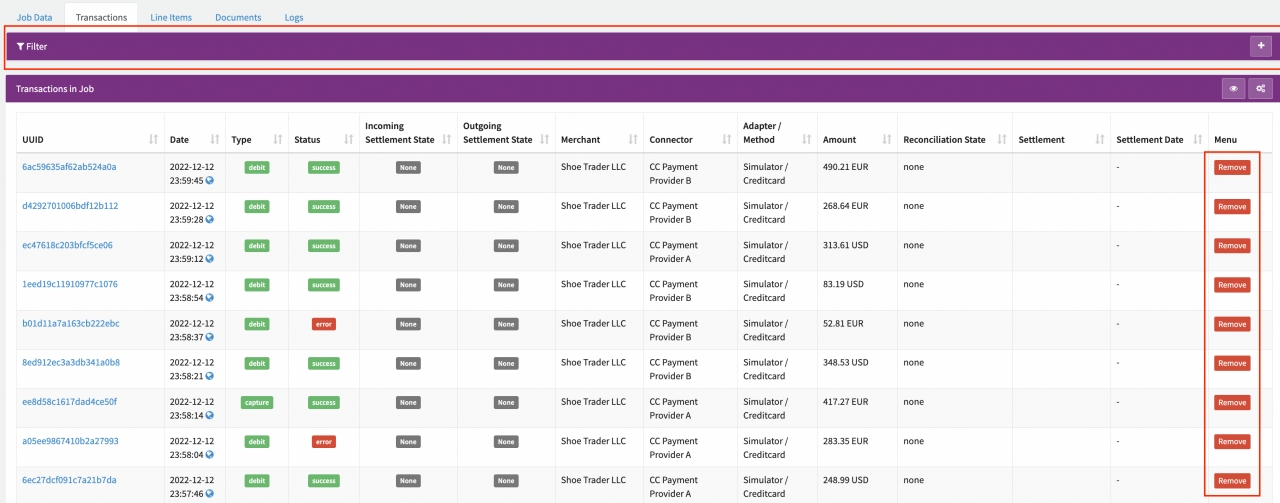 Transaction Tab
 Line Item Tab
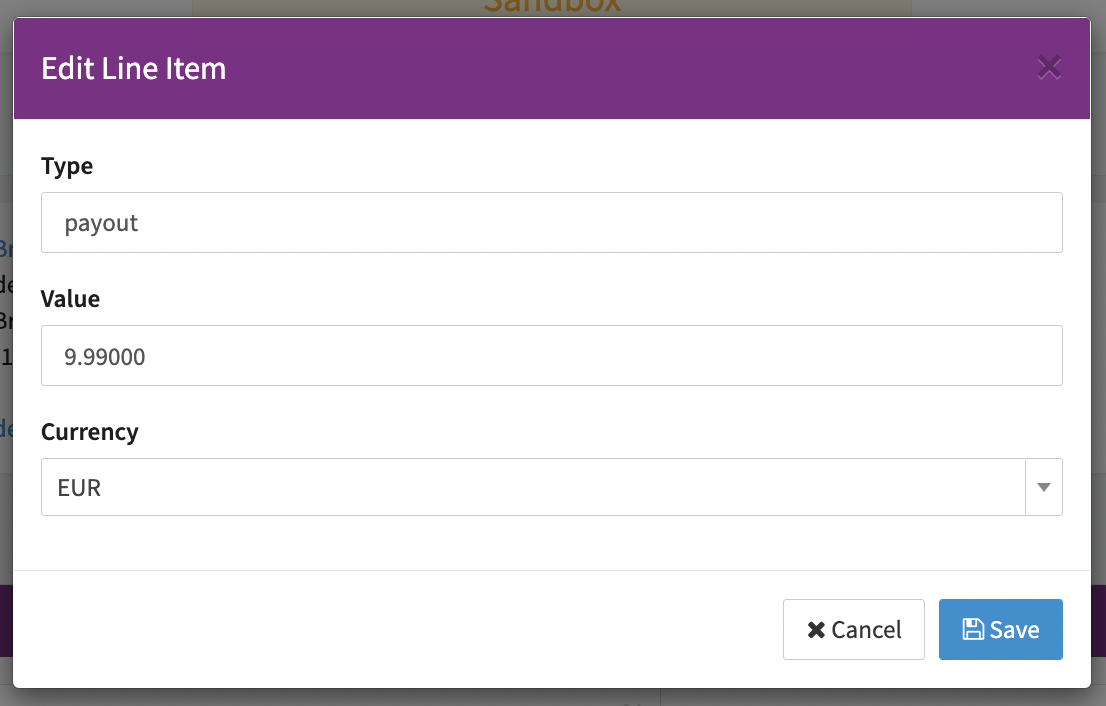 Confirmation Line Item Change
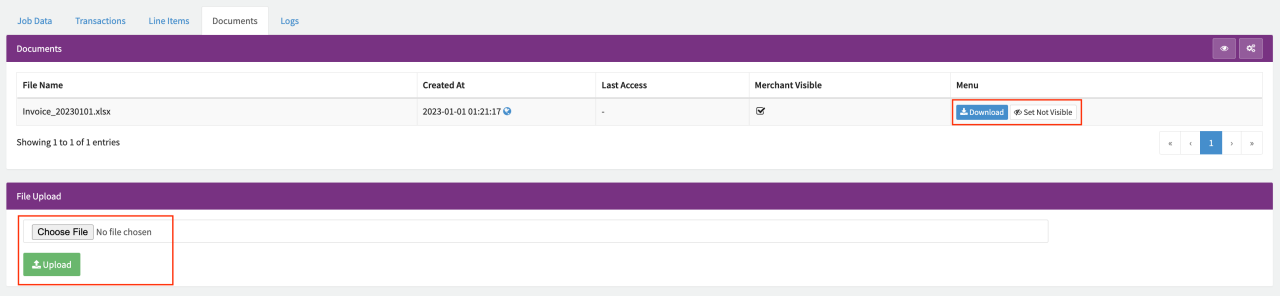 Documents Tab
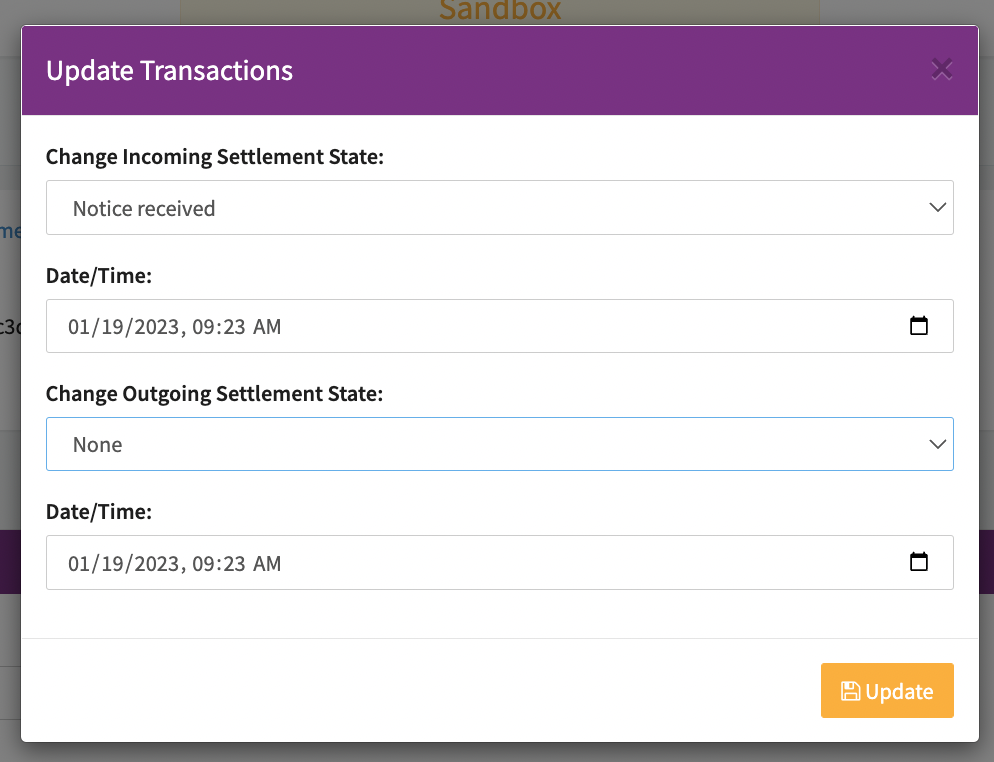 Change Transaction States
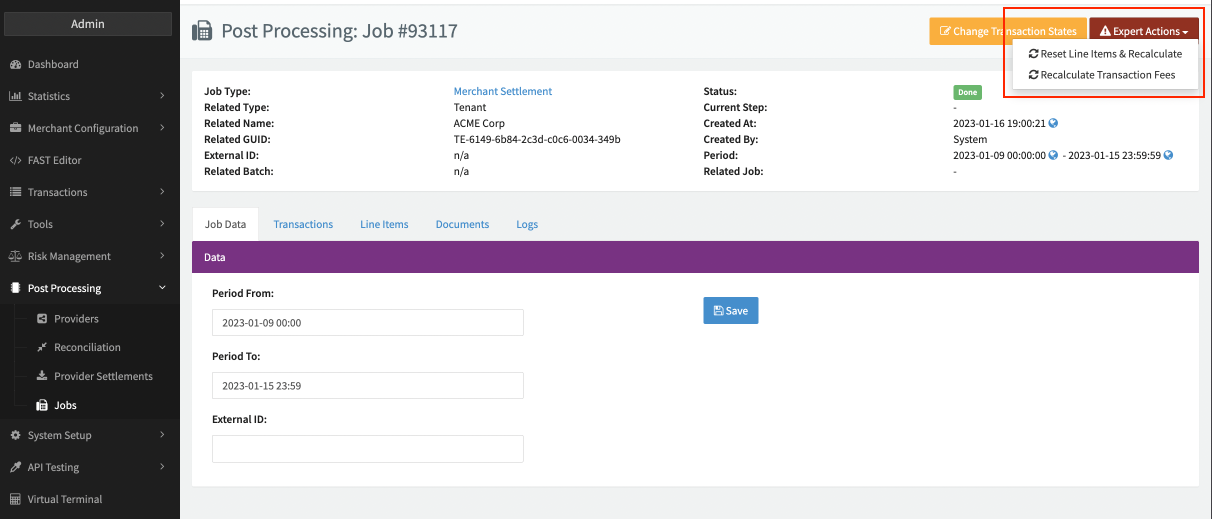 Expert Actions
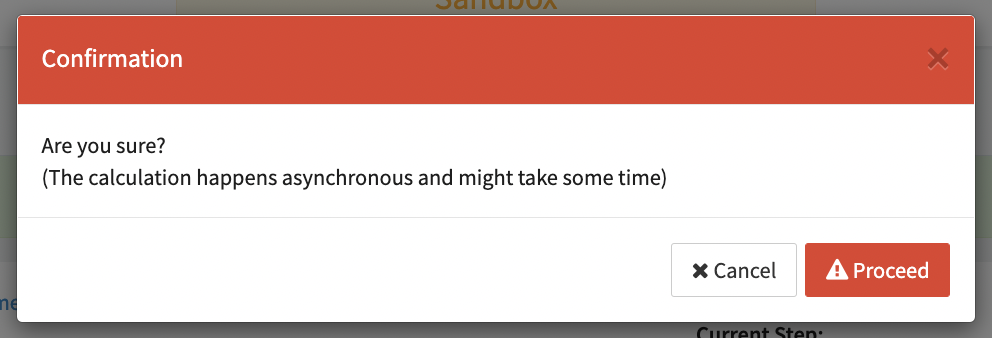 Recalculate Transaction Fees
Files are retained for 12 months and permanently deleted thereafter.