> For clean Markdown of any page, append .md to the page URL.
> For a complete documentation index, see https://ixopay.ferndocs.com/user-manual/manual/connector/multi-method-connector/payment-selection-template/llms.txt.
> For AI client integration (Claude Code, Cursor, etc.), connect to the MCP server at https://ixopay.ferndocs.com/_mcp/server.
# Payment Selection Template
## Multi-Method Connector
In order to use **Payment Selection Page** a Multi-Method (Meta-)Connector is needed. Please refer to [Multi-Method Connector](https://documentation.ixopay.com/manual/docs/connector/multi-method-connector) for the configuration. Once your Multi-Method (Meta-)Connector is setup, you are ready to tackle the payment selection page:
1. Navigate to the Payment Template section of the Mulit-Method (Meta-) Connector (see Connector Details Overview)
2. Create a Payment Template as described in the [Payment Templates](https://documentation.ixopay.com/manual/docs/connector/edit/payment-templates) section
3. Customize Payment Template
4. Publish Payment Template in Fast Editor
In comparison to a Connector, Mullit-Method (Meta-) Connectors can be found under a different path in the [Fast Editor](https://documentation.ixopay.com/manual/docs/fast):
`/vhosts/[host address, e.g. sandbox.ixopay.com]/layouts/default/internal-pages/payment/meta/index.en.php`
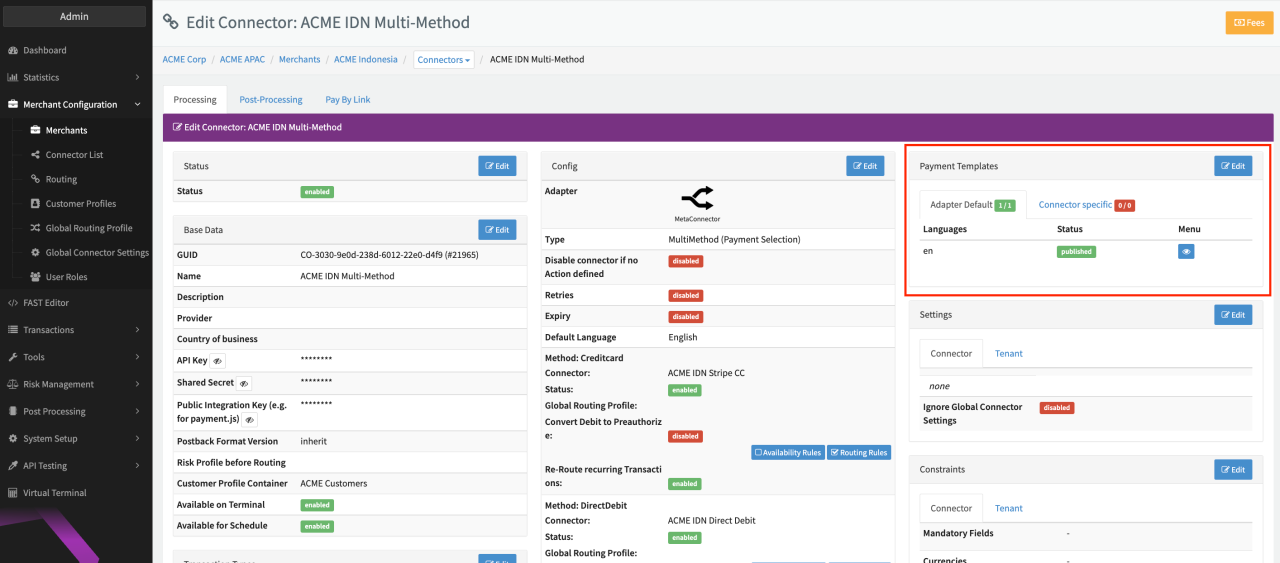Connector Details Overview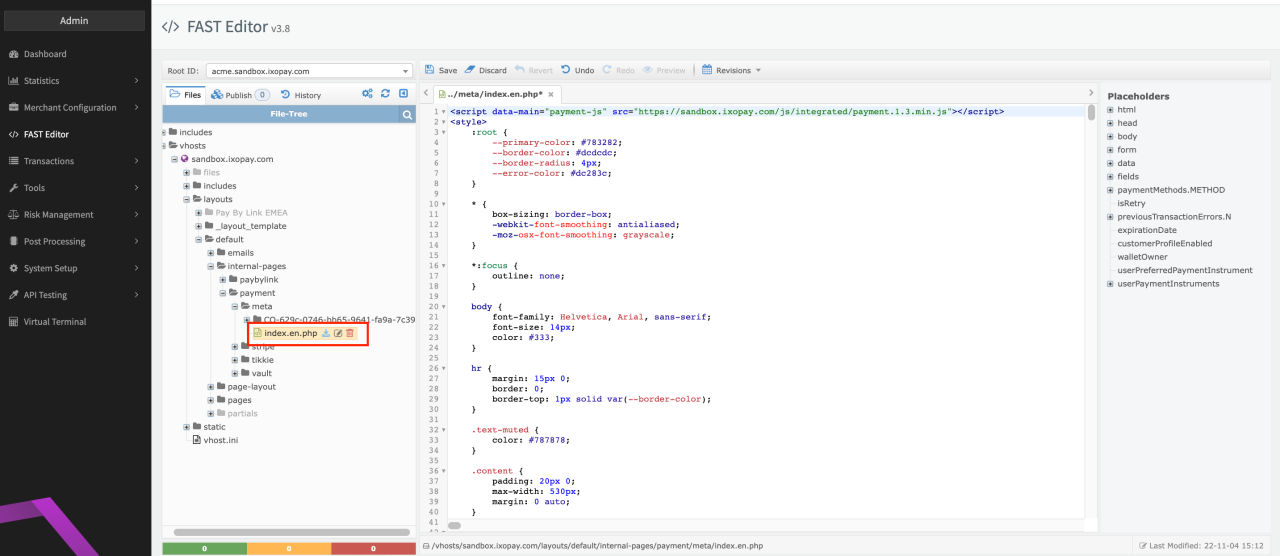Path Fast Editor
> **Tip**
>
> While it can be handy to edit the page through the Connector edit view, remember that you need to [publish changes via the FAST Editor](https://documentation.ixopay.com/manual/docs/fast) in order the changes take effect.
## Customize Payment Selection Template
If you created your Payment Selection Template to be prefilled with the default templates, you can easily customize and adjust the templates to your needs. Find some example customizations below:
### Coloring
One of the first blocks within the Payment Selection Template is the `<style>` block followed by **CSS3 variables**. Change the colors to fit your desired layout of the template.
Further style elements can be changed in this section such as fonts, margins and logos, but keep in mind that changes to the design might lead to further adjustments regarding colors.
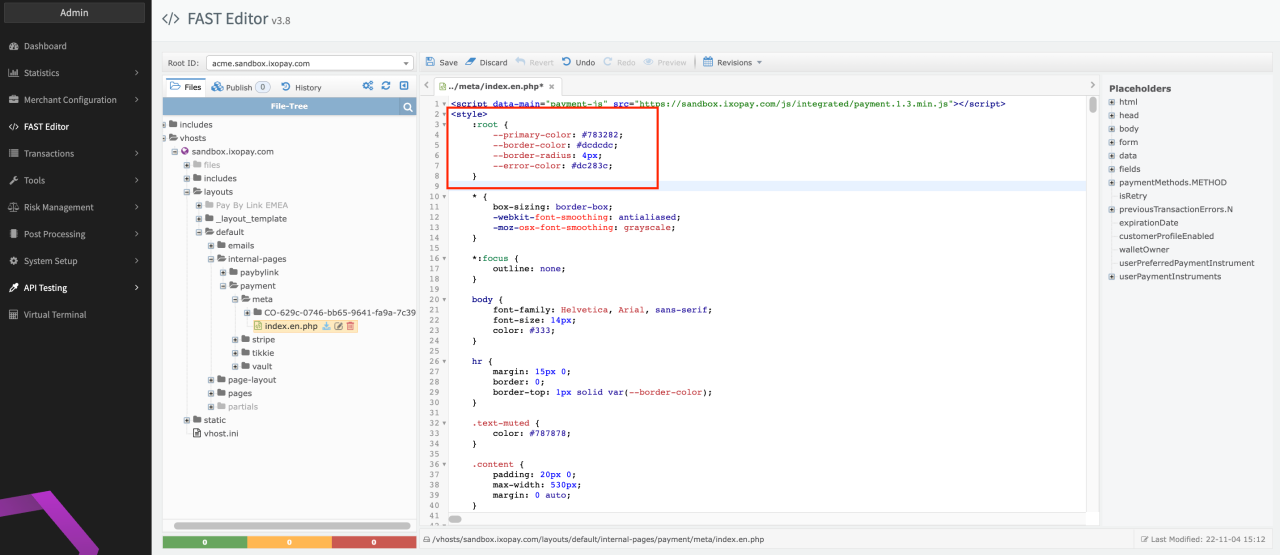Colors
### Global mandatory fields
Each payment method requires different mandatory fields, e.g. IBAN or Credit Card number. However, for some fields such as name or address, it can make sense to make them mandatory for every payment method. You can define such **global** **mandatory fields** by editing the variable set forceField.
In the example below, the field first\_name and last\_name will appear for every payment method form.
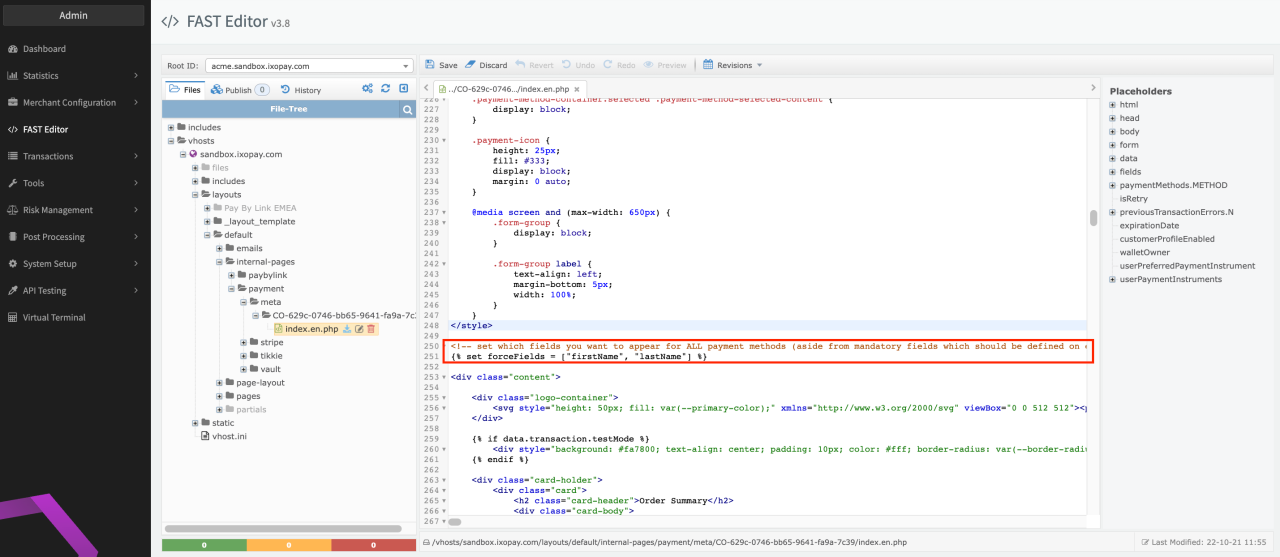Global mandatory fields
```twig
{% set forceFields = ["firstName", "lastName"] %}
```
@@CALLOUT\_OPEN|note|@@
It is important to note that mandatory fields, which can be configured on each Connector in the Constraints section or in the Global Connector Settings, will be added automatically to the corresponding payment method form. Keep in mind that with that the payment selection page might display certain fields multiple times. In this case you may want to adjust the constraints of the Connector or the global mandatory field list.
| Available global mandatory fields |
| --------------------------------- |
| identification |
| firstName |
| lastName |
| birthDate |
| gender |
| billingAddress1 |
| billingAddress2 |
| billingCity |
| billingPostcode |
| billingState |
| billingCountry |
| billingPhone |
| shippingFirstname |
| shippingLastname |
| shippingCompany |
| shippingAddress1 |
| shippingAddress2 |
| shippingCity |
| shippingPostcode |
| shippingState |
| shippingCountry |
| shippingPhone |
| company |
| email |
| nationalId |
| iban |
| bic |
| cardHolder |
| expiry |
| cardToken |
### Defining payment method specific fields
The payment methods are passed to the template page, as an array named **paymentMethods**. In order to interpret and display available payment methods, you should ideally use a loop. To get a better grasp of how this works, it is recommended to take a look at the provisioned default template file before creating your own. Now in order to add fields specific to a payment method, e.g. Credit Cards or Direct Debit, you have to add the placeholder fields once the loop reaches the corresponding method. To check the current method of the loop, make use of the **apiIdentifier** of the current method (**m.apiIdentifier**). The names themselves can be found in the configuration tab of the Connector Details Overview.
#### Example
```twig
{% if m.apiIdentifier == 'DirectDebit' %}
{% endif %}
```
### Display payment methods
The available payment methods (based on [configured Connectors and Rules](https://documentation.ixopay.com/manual/docs/connector/multi-method-connector)) are interpreted automatically and passed to Payment Selection Page. Here the payment methods are read using a loop with each method getting their own form with corresponding fields (as defined in the section above). In our prefilled design, each payment method will be represented using an image (see Payment selection page example).
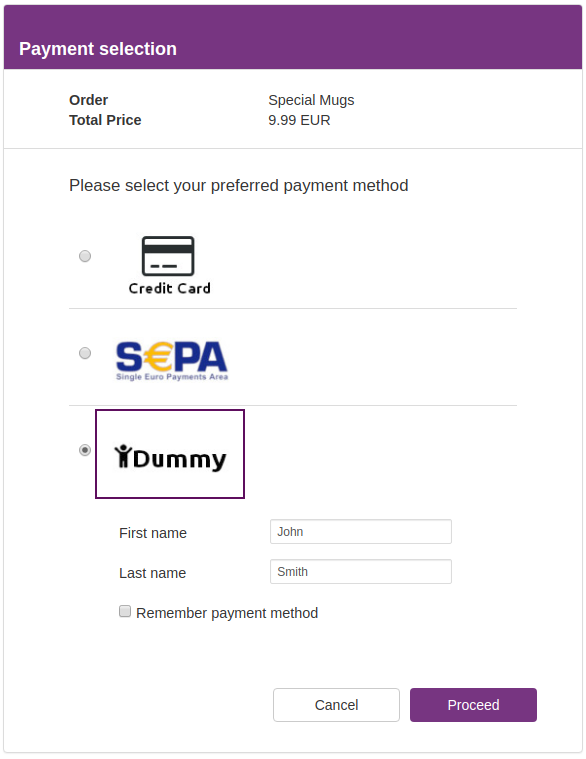Payment selection page example
To replace the **images** , simply upload your own images for each payment method and replace the corresponding parts in the template as described in the [Static section in the Fast Editor Setup.](https://documentation.ixopay.com/manual/docs/fast)
```twig
{% if method == "Method1" %}
; ?>) {% elseif method == "Method2" %}
{% elseif method == "Method2" %}
; ?>) {% elseif method == "Method3" %}
{% elseif method == "Method3" %}
; ?>) {# ... #}
{% else %}
{# ... #}
{% else %}
{{ m.name }}
{% endif %}
```
#### Example
For the payment method **Credit Card** the uploaded **creditcard.png** file, for **DirectDebit** the **directdebit.png** and for **Dummy** the **dummy.png** should be used. Therefore the corresponding method and file paths need to be updated in the code snippet shown above. The available methods can be found in the configuration tab of the Connector Details Overview (see Connector Details Overview - Method names).
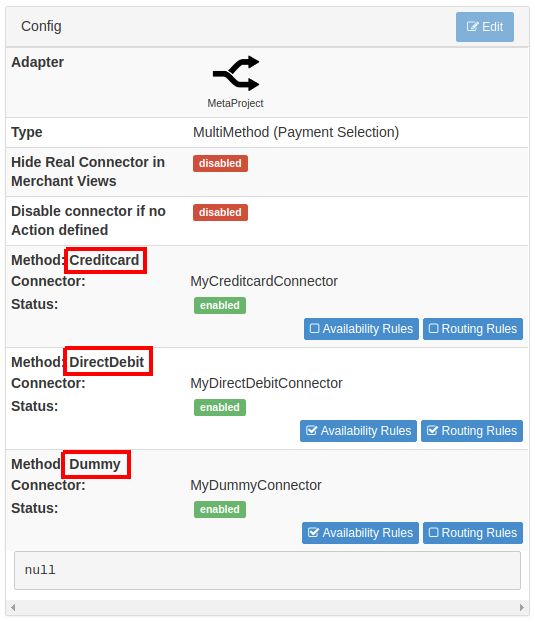Connector Details Overview - Method names
```twig
{% if method == "Creditcard" %}
; ?>) {% elseif method == "DirectDebit" %}
{% elseif method == "DirectDebit" %}
; ?>) {% elseif method == "Dummy" %}
{% elseif method == "Dummy" %}
; ?>) {% else %}
{% else %}
{{ m.name }}
{% endif %}
```
## Customer Profiles
The IXOPAY platform provides the option to use [Customer Profiles](https://documentation.ixopay.com/manual/docs/tokenization/customer-profiles) with Multi-Method (Meta-)Connectors. If enabled, you can modify your Payment Selection Page in a way to give customers the option to save their payment instruments if supported by the payment method, for future purchases or for recurring transactions (depending on your business model).
To enable the option in your Payment Selection Page (see Customer Profile Options) follow the instructions [Customer Profiles](https://documentation.ixopay.com/manual/docs/tokenization/customer-profiles) - Setting up the Hosted Payment Page with Customer Profiles.
With that:
* Customers without a Customer Profile can save a payment instrument and set as preferred.
* Existing Customer Profile Customers can update their profile by adding new payment instruments and updating their preferences.
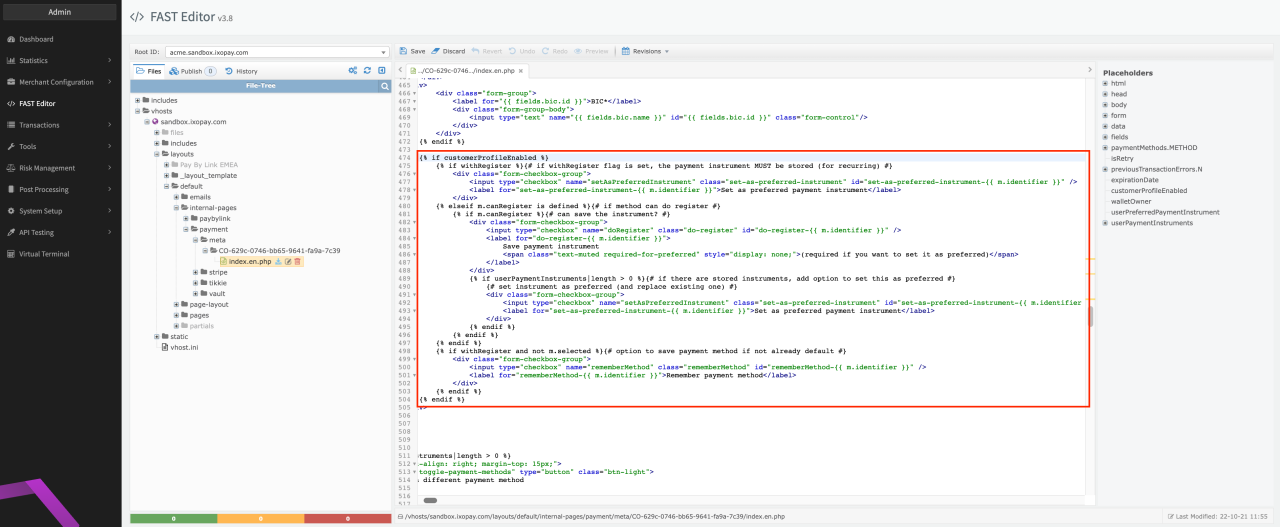Customer Profile Options