> For clean Markdown of any page, append .md to the page URL.
> For a complete documentation index, see https://ixopay.ferndocs.com/user-manual/manual/connector/advanced-configuration/apple-pay-google-pay/llms.txt.
> For AI client integration (Claude Code, Cursor, etc.), connect to the MCP server at https://ixopay.ferndocs.com/_mcp/server.
# ApplePay & Google Pay
> **Tip**
>
> For ApplePay/Google Pay, the IXOPAY platform also provides the `binCountry` in `returnData` object. Please note that BIN ranges might not refer to the BIN country of the underlying card. This is due to the matching being performed using the dPan. Furthermore [Routing](https://documentation.ixopay.com/manual/docs/connector/routing-cascading-balancing-fallback) and [Risk Management](https://documentation.ixopay.com/manual/docs/risk-management) relying on BIN data are not supported for Apple Pay/Google Pay.
## ApplePay Configuration
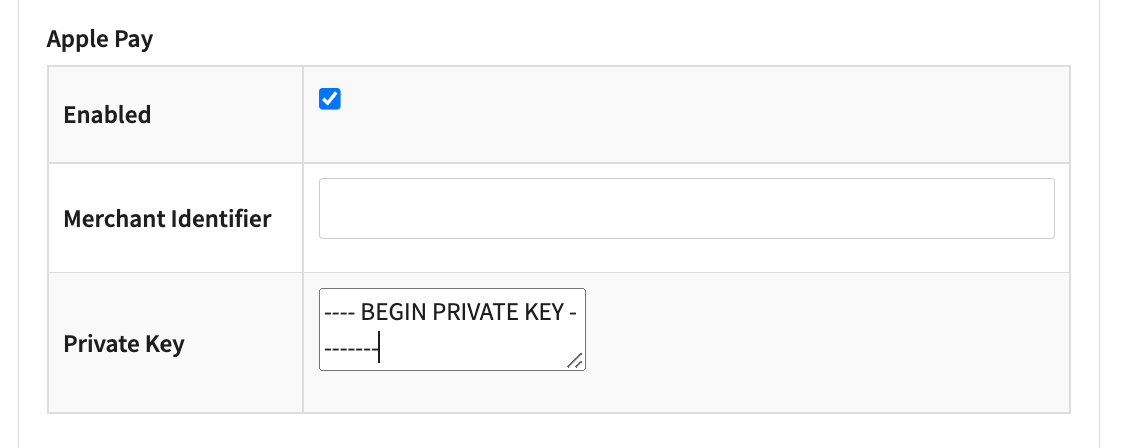
In case a connector supports ApplePay token processing, ou will be presented with the configuration under the **Vault Configuration** tab (see Image ApplePay connector configuration). Configure the following parameters:
* Select **Enabled** to enable ApplePay Token Processing
* Fill in the mandatory **Merchant Identifier** provided by Apple to you (see ApplePay Merchant Setup)
* Fill in the **Private Key** - This is the private key of your **ApplePay Payment Processing Certificate** , for further information consult the Apple documentation [https://developer.apple.com/documentation/apple\_pay\_on\_the\_web/configuring\_your\_environment](https://developer.apple.com/documentation/apple_pay_on_the_web/configuring_your_environment)
ApplePay connector configuration
> **Note**
>
> With payment.js the Apple Pay token generation is the merchant's responsibility. Refer to the [API documentation](https://documentation.ixopay.com/adapters/applepay) for further information.
## Hosted Payment Page (HPP) Configuration for ApplePay Button
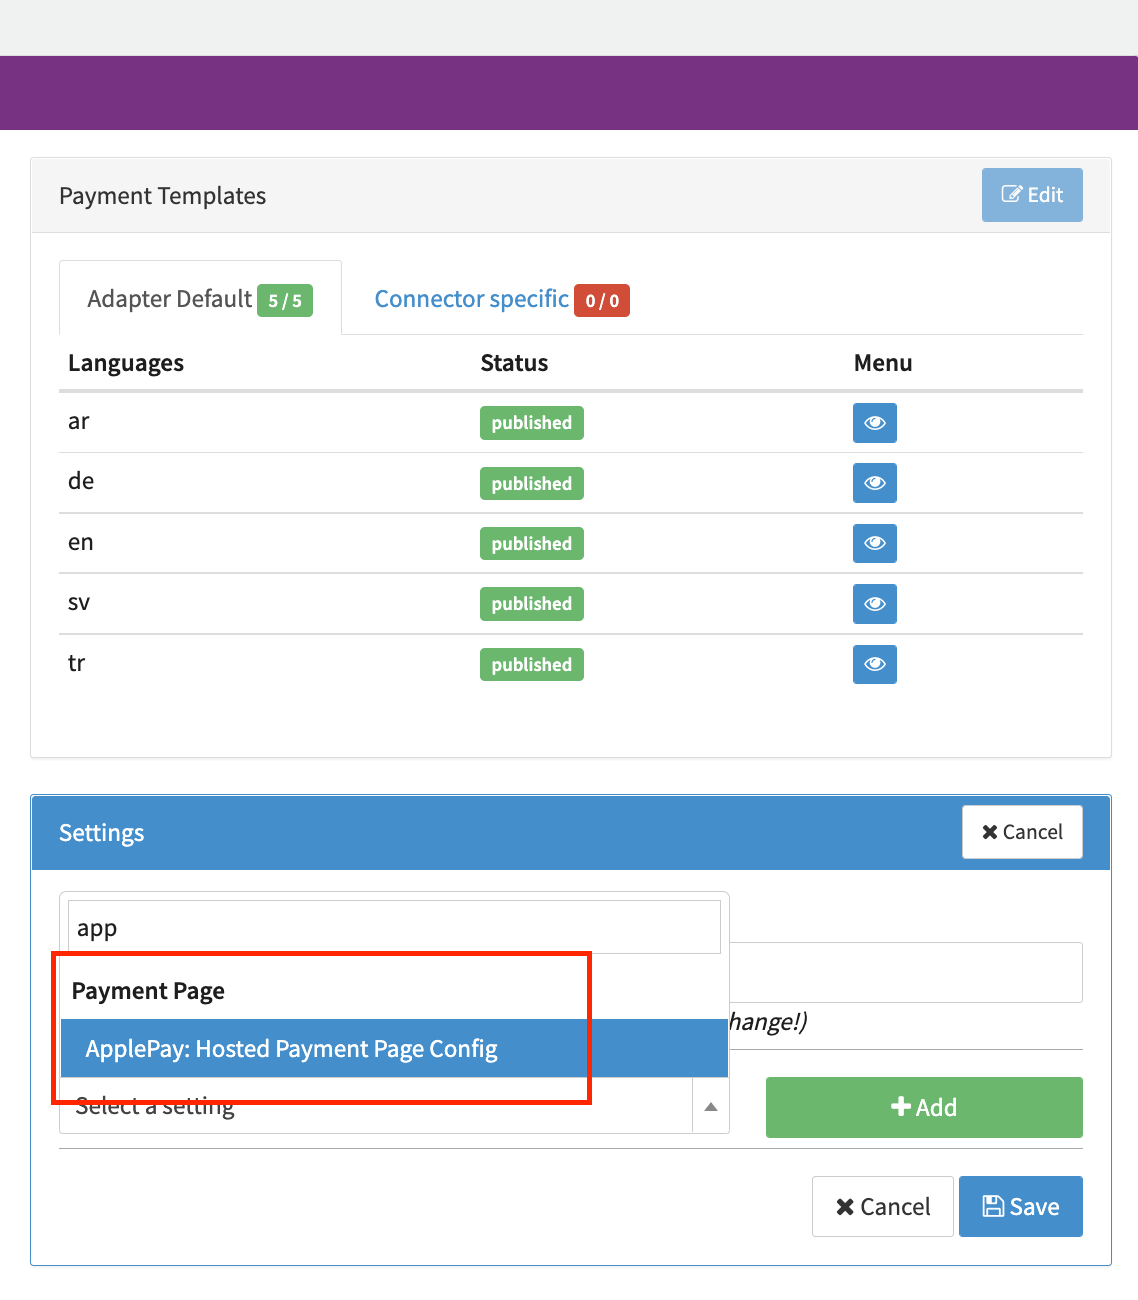
To use the ApplePay Button for the IXOPAY Hosted Payment Pages, a Connector that supports ApplePay needs to be configured as described above. Furthermore the **ApplePay: Hosted Payment Page Config** in the **Settings** section of that connector needs to be added (see Image Adding ApplePay HPP setting) and configured (see Image ApplePay HPP Configuration).
Adding ApplePay HPP setting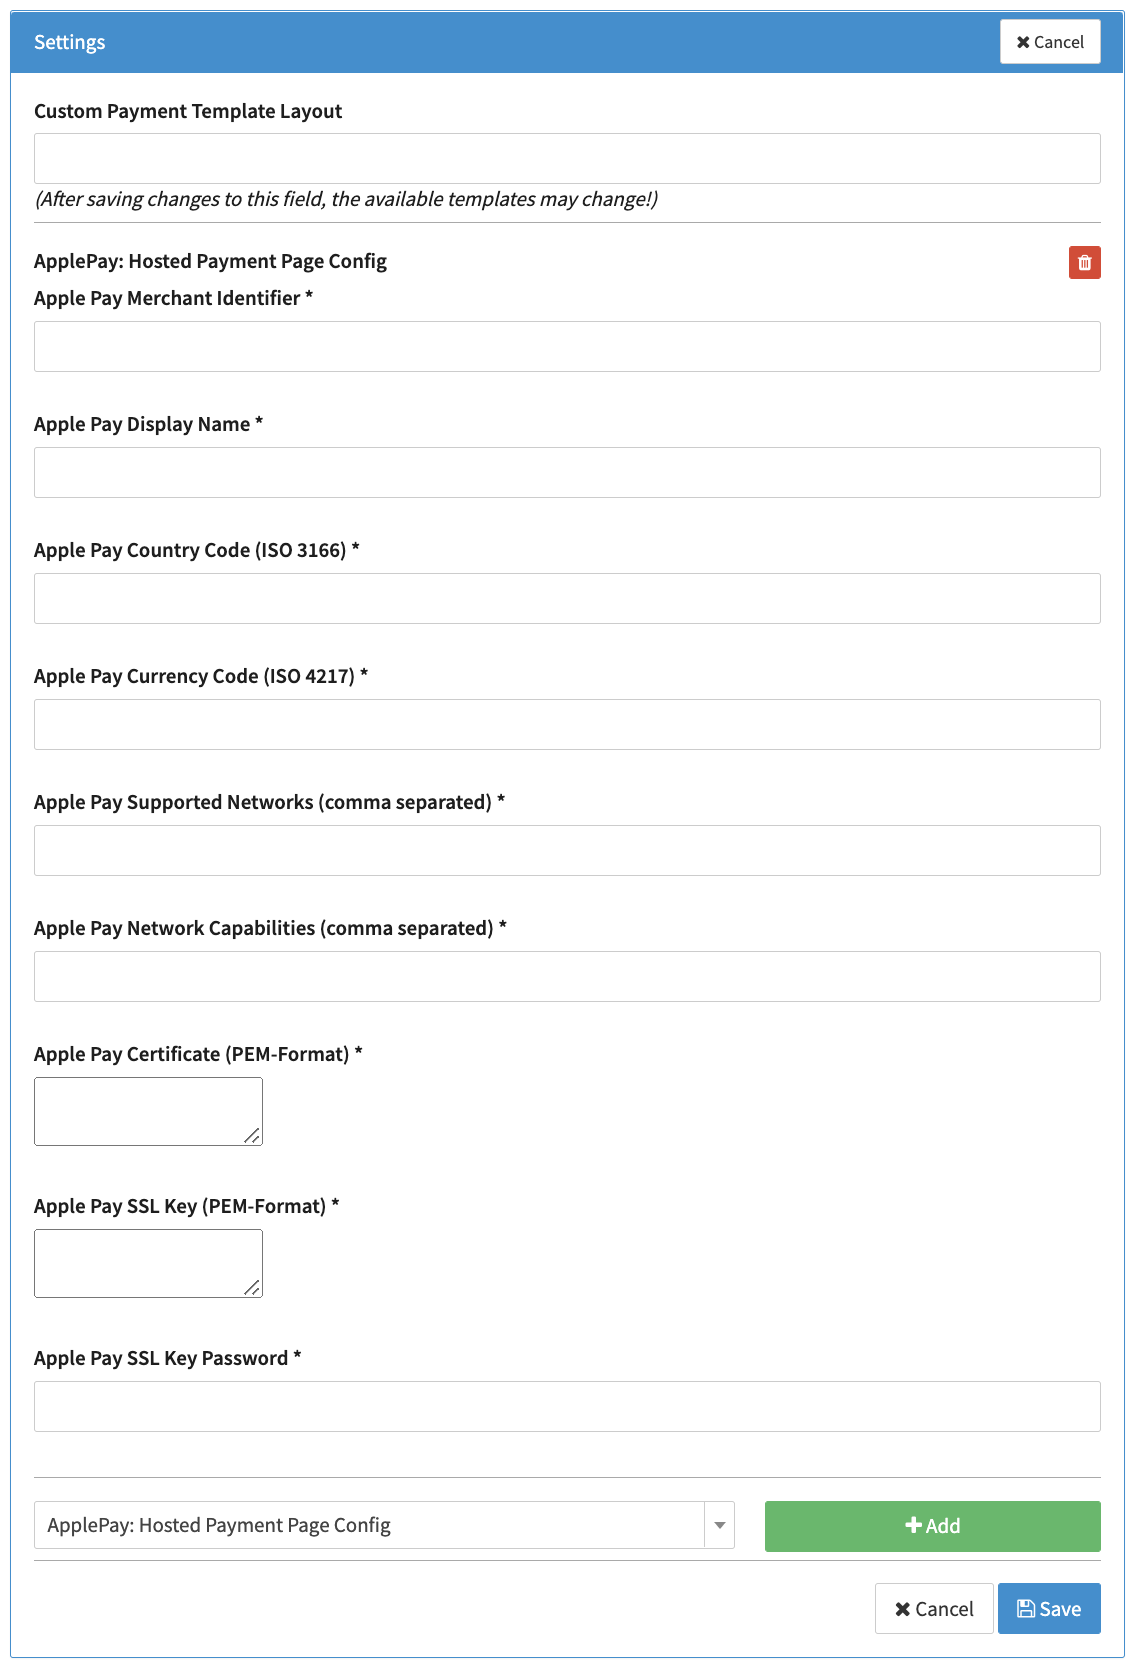ApplePay HPP Configuration
* **Apple Pay Merchant Identifier** - This has to be filled with the Merchant Identifier provided by Apple to you (same parameter as in the **Vault Setup** section)
* **Apple Pay Display Name** - A string, suitable for display, that describes the card (see [https://developer.apple.com/documentation/apple\_pay\_on\_the\_web/applepaypaymentmethod/1916110-displayname](https://developer.apple.com/documentation/apple_pay_on_the_web/applepaypaymentmethod/1916110-displayname))
* **Apple Pay Country Code (ISO 3166)** - The merchant’s two-letter ISO 3166 country code (see [https://developer.apple.com/documentation/apple\_pay\_on\_the\_web/applepaypaymentrequest/1916117-countrycode](https://developer.apple.com/documentation/apple_pay_on_the_web/applepaypaymentrequest/1916117-countrycode))
* **Apple Pay Currency Code (ISO 4217)** - Three-letter code for the currency (see [https://developer.apple.com/documentation/apple\_pay\_on\_the\_web/applepaypaymentrequest/1916118-currencycode](https://developer.apple.com/documentation/apple_pay_on_the_web/applepaypaymentrequest/1916118-currencycode))
* **Apple Pay Supported Networks (comma separated)** - The payment networks the merchant supports (see [https://developer.apple.com/documentation/apple\_pay\_on\_the\_web/applepaypaymentrequest/1916122-supportednetworks](https://developer.apple.com/documentation/apple_pay_on_the_web/applepaypaymentrequest/1916122-supportednetworks))
* **Apple Pay Network Capabilities (comma separated)** - The payment capabilities supported by the merchant (see [https://developer.apple.com/documentation/apple\_pay\_on\_the\_web/applepaypaymentrequest/1916123-merchantcapabilities](https://developer.apple.com/documentation/apple_pay_on_the_web/applepaypaymentrequest/1916123-merchantcapabilities))
* **Apple Pay Certificate (PEM-Format)** - This is your Merchant Identity Certificate **merchant\_id.cer** (see [https://developer.apple.com/documentation/apple\_pay\_on\_the\_web/configuring\_your\_environment](https://developer.apple.com/documentation/apple_pay_on_the_web/configuring_your_environment) and ApplePay Merchant Setup)
* **Apple Pay SSL Key (PEM-Format)** - This is your **merchant certificate’s private key,** used for the creation of the merchant certificate (see [https://developer.apple.com/documentation/apple\_pay\_on\_the\_web/configuring\_your\_environment](https://developer.apple.com/documentation/apple_pay_on_the_web/configuring_your_environment) and ApplePay Merchant Setup)
* **Apple Pay SSL Key Password** - This is your Merchant Certificate SSL Password (see [https://developer.apple.com/documentation/apple\_pay\_on\_the\_web/configuring\_your\_environment](https://developer.apple.com/documentation/apple_pay_on_the_web/configuring_your_environment))
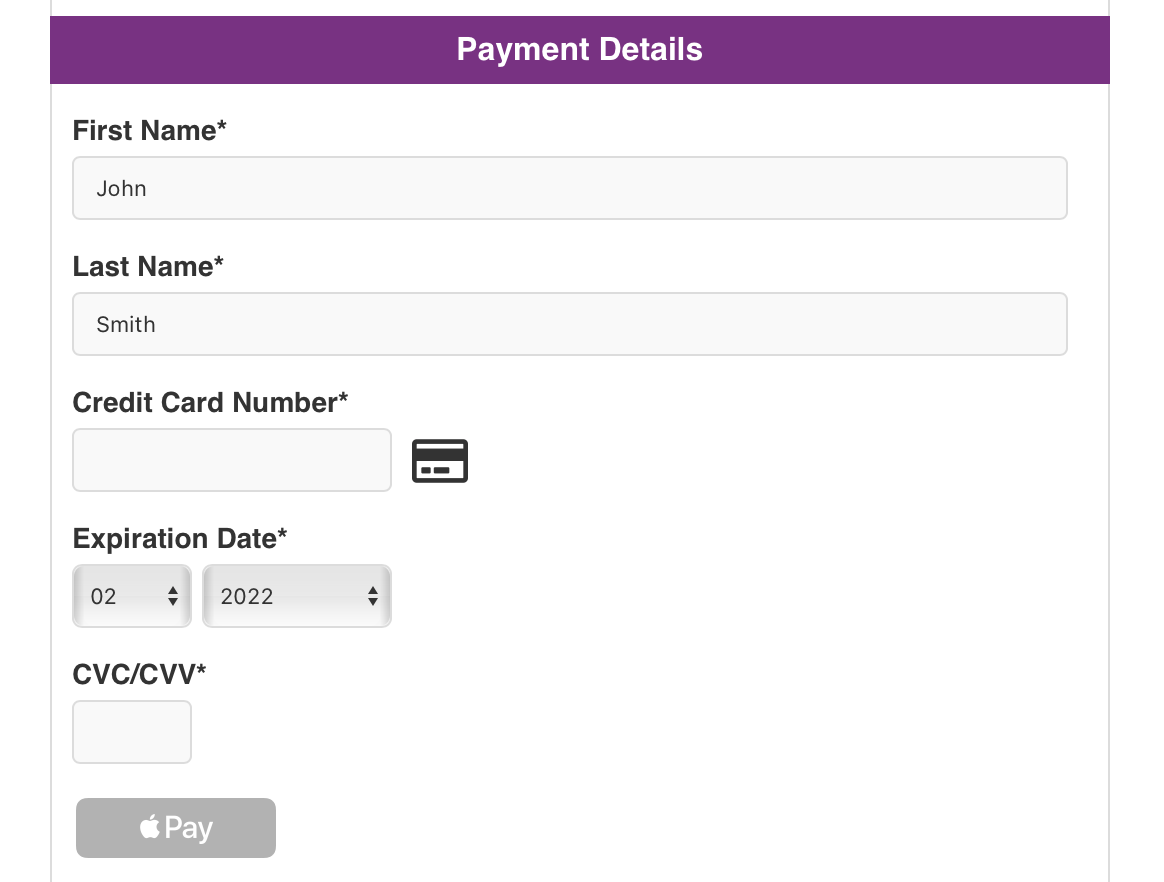
To activate the ApplePay Button in the IXOPAY platform hosted payment page, the following code snippets need to be added to your payment templates via the FAST Editor:
* The container the button will be displayed in
Example HPP with ApplePay Button
```html
```
> **Note**
>
> When adding new payment template and activate the **Prefill template** option, the required code snipped is include in the template by default. Simply uncomment the relevant code lines to use it.
> **Info**
>
> The ApplePay Button is only visible using Safari on MacOS devices.
## ApplePay for other Browsers
To support Apple Pay for other browsers, some adjustments can be made on the HPP.
### Hosted Payment Page Adjustments
```html
PaymentFormApplePay.initialize( "apple-pay-button", ...
```
## GooglePay Configuration
In case a connector supports GooglePay Token Processing, you will be presented with the following configuration under the **Vault Configuration** tab (see Image GooglePay connector configuration). Configure the following parameters:
* Select **Enabled** to enable GooglePay Token Processing
* Fill in the mandatory **Merchant Identifier** - GooglePay Gateway Merchant Identifier provided by Google (refer to [https://developers.google.com/pay/api/web/guides/setup#registration](https://developers.google.com/pay/api/web/guides/setup#registration)) for Production usage - in order to perform Google registration test cases you can use any string to configure connectors in the IXOPAY platform Sandbox environments, we recommend to use merchant’s GUID.
* Fill in the **Name of test key in vault** - Test key provided by IXOPAY for the IXOPAY platform Sandbox environment
* Fill in the **Name of production key in vault** - Production key provided by IXOPAY for the IXOPAY platform production environment
* Select **Test Environment Enabled** - transactions will be sent to Google's test environment
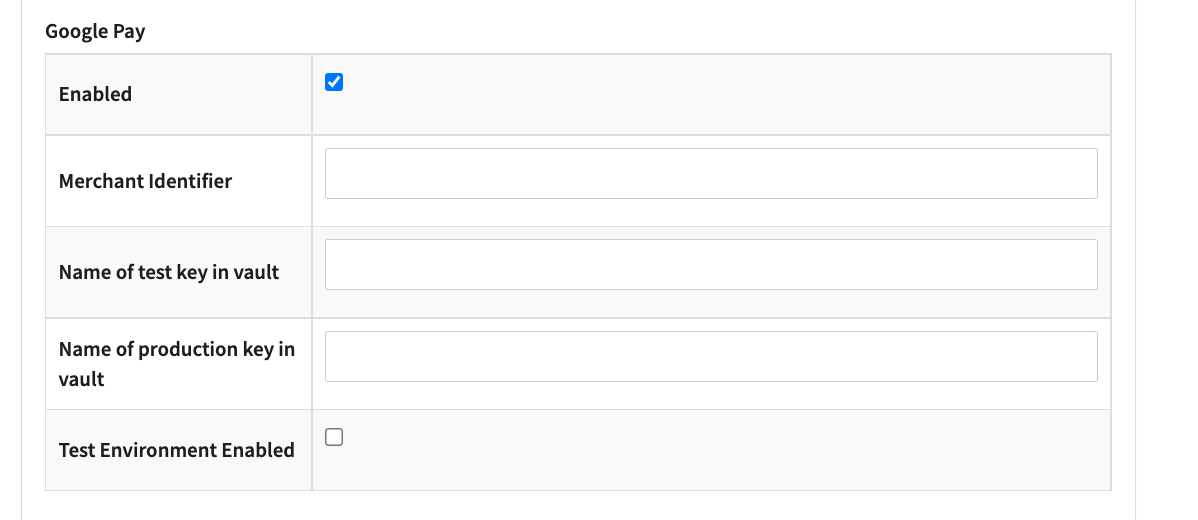GooglePay connector configuration
> **Note**
>
> **Test Environment Enabled** has to be checked explicitly and is not linked to the general connector configuration “Test Mode”.
> **Note**
>
> With payment.js the GooglePay token generation is the merchants responsibility, refer to the [API documentation](https://documentation.ixopay.com/adapters/googlepay) for further information.
## Hosted Payment Page (HPP) Configuration for GooglePay Button
To use the GooglePay Button for the IXOPAY hosted payment pages, a connector that supports GooglePay needs to be configured as described above. Furthermore the **googlepay :hpp-config** in the **Settings** section of that connector needs to be added (see Image Adding GooglePay HPP setting) and configured (see Image GooglePay HPP Configuration).
* **Your GooglePay Merchant ID** - Parameter provided by Google for the Production environment (see [https://developers.google.com/pay/api/web/reference/request-objects#MerchantInfo](https://developers.google.com/pay/api/web/reference/request-objects#MerchantInfo))
* **GooglePay Merchant Name** - Parameter provided by Google for the Production environment (see [https://developers.google.com/pay/api/web/reference/request-objects#MerchantInfo](https://developers.google.com/pay/api/web/reference/request-objects#MerchantInfo))
* **GooglePay Gateway Merchant Id** - Merchant identifier provided by Google to you (same parameter as in the **Vault Setup** section)
* **Allowed Card Networks** - Card networks are allowed to be processed by the GooglePay Button. If none is defined - all default values will be active.
* **Allowed Card Auth Methods** - Allowed card Authorization methods. If none is defined - all default values are active.
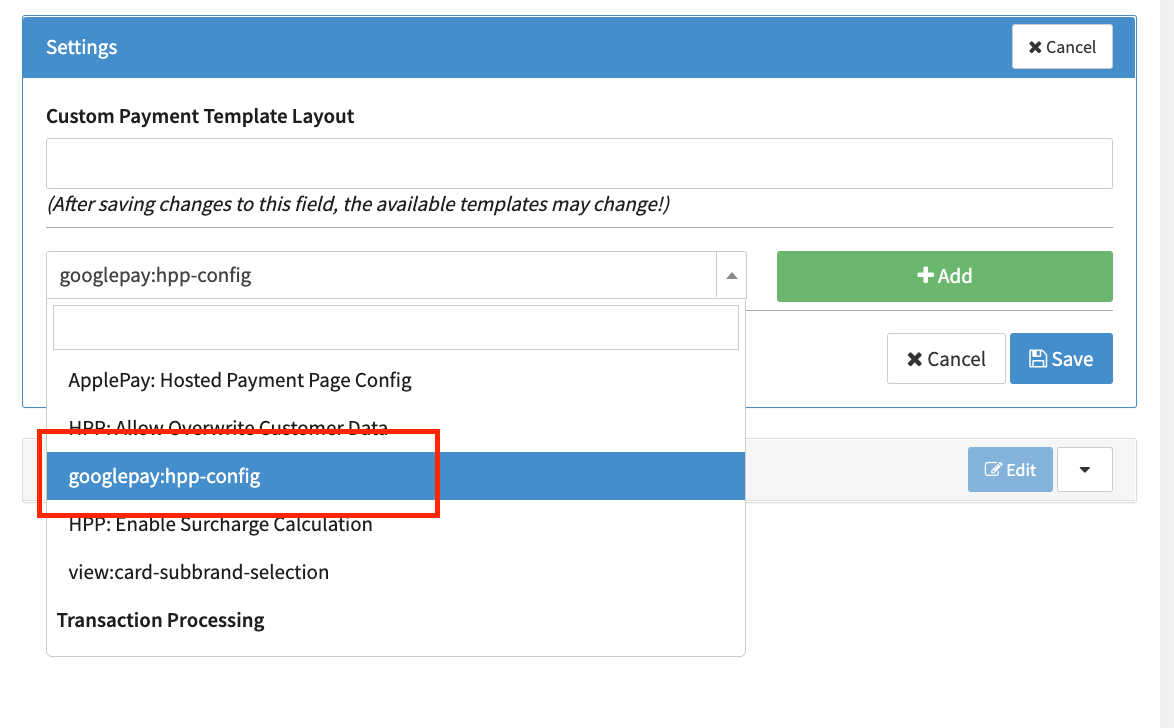Adding GooglePay HPP setting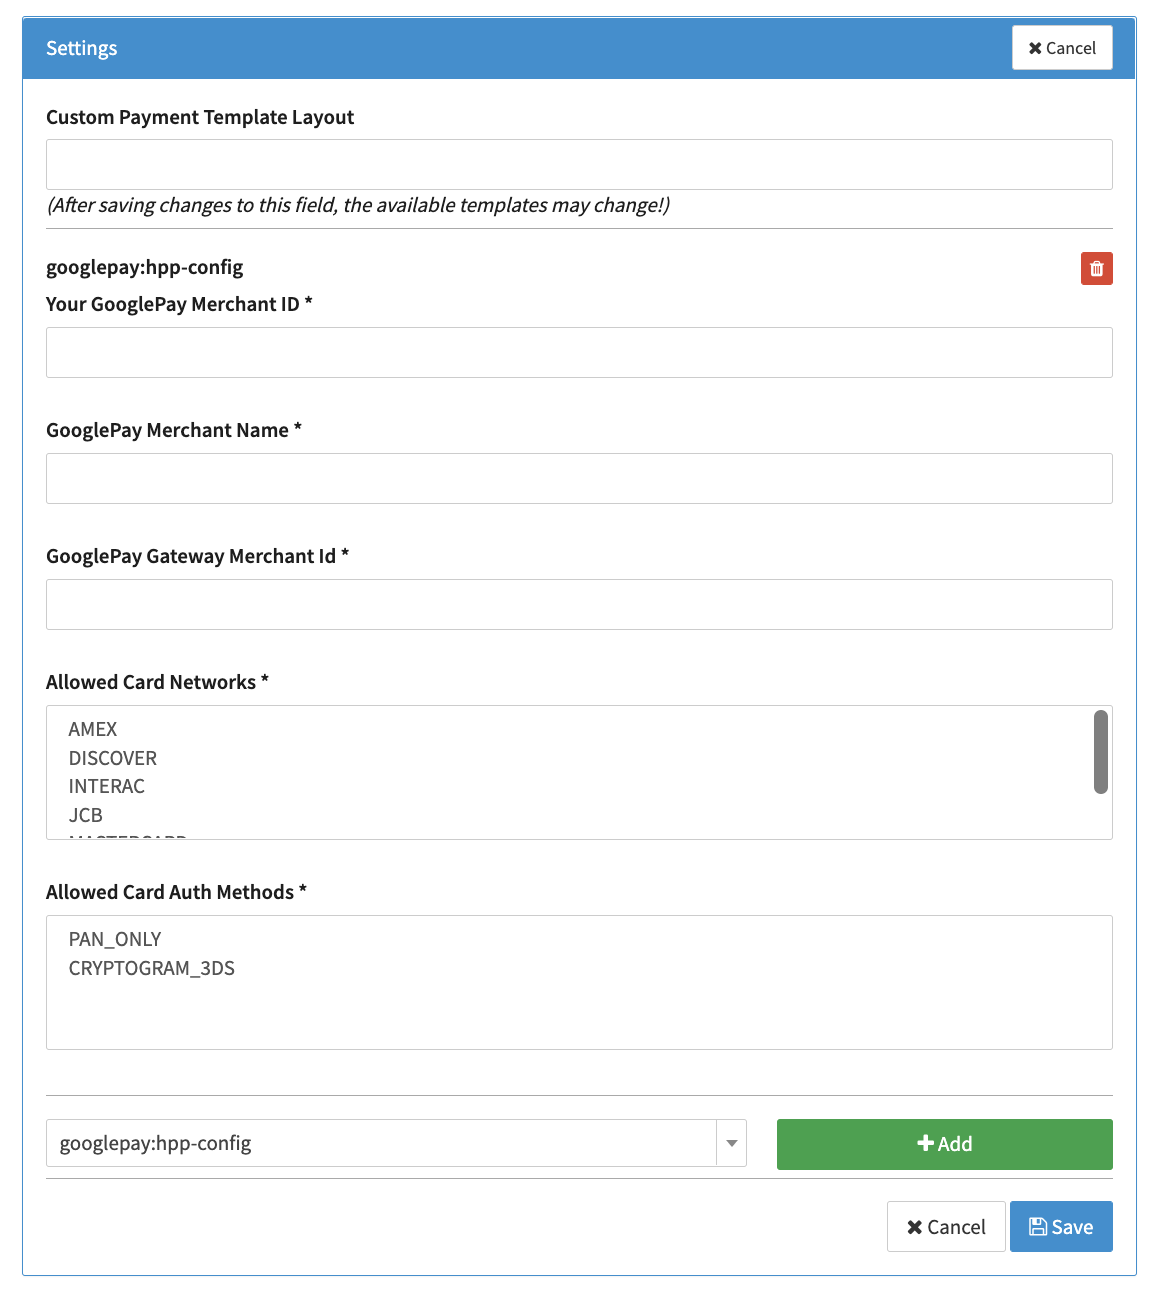GooglePay HPP Configuration
To activate the GooglePay button in the IXOPAY HPP the following code snippets need to be added to your payment templates via the FAST Editor.
* The container the button will be displayed in
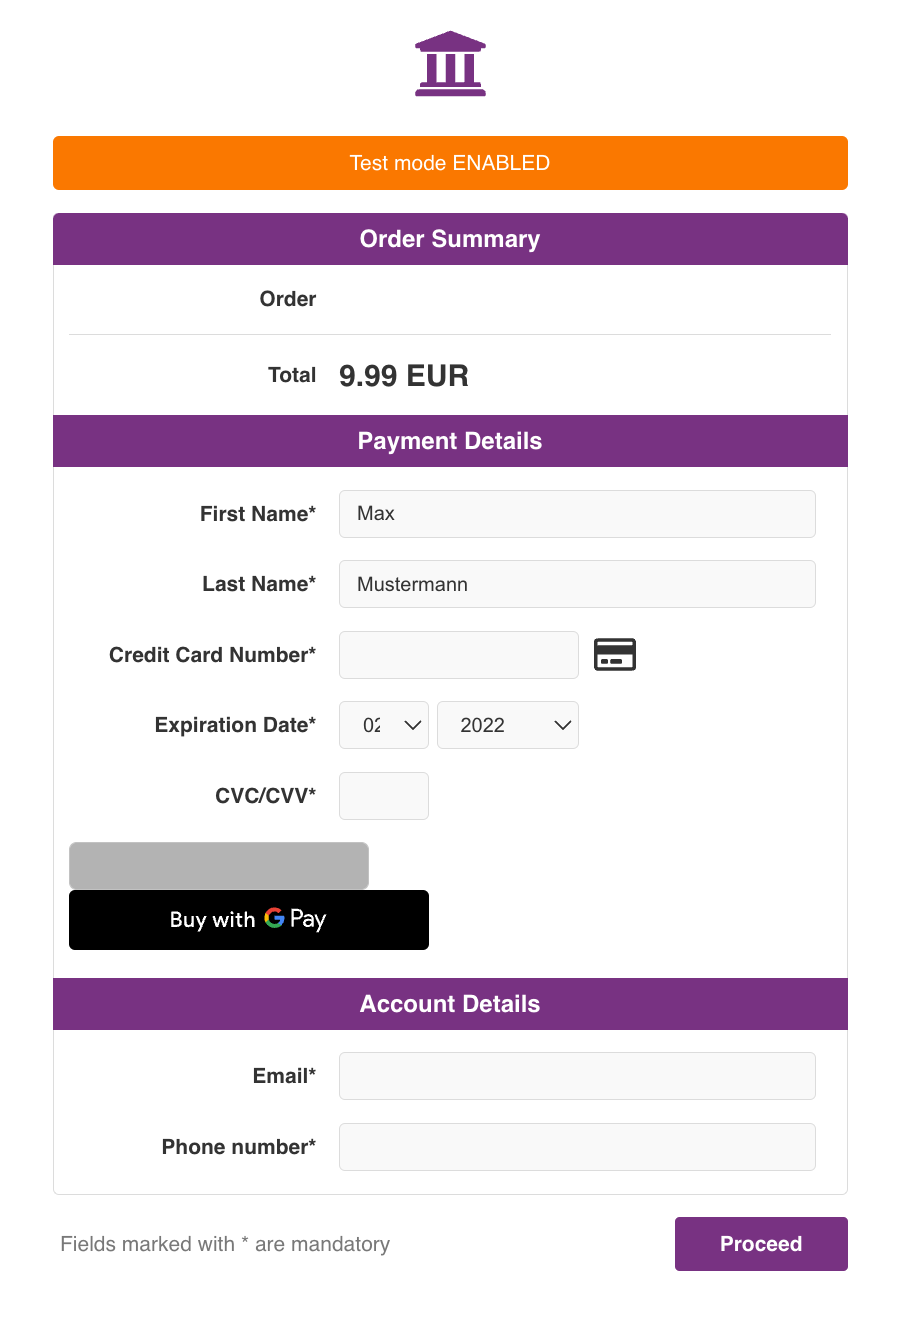Example HPP with GooglePay Button
```html
```
> **Note**
>
> When adding new payment template and activate the **Prefill template** option, the required code snipped is include in the template by default. Simply uncomment the relevant code lines to use it.
## Passthrough Tokens
The IXOPAY platform is able to either decrypt GooglePay and ApplePay tokens and pass the decrypted data or to pass the tokens through to a provider for decryption.
To activate the passthrough to the provider, enable the **Enable Passthrough Tokens** check box in the Connector Vault Configuration (See Passthrough).
Passthrough
## ApplePay Merchant Setup
### Create a merchant identifier
A merchant identifier uniquely identifies you to ApplePay as a merchant who is able to accept payments. A merchant identifier never expires, and you can use the same one for multiple apps. In order to use ApplePay we recommend creating a **new Merchant Identifier**
* In **Certificates, Identifiers & Profiles**, click **Identifiers** in the sidebar, then click the select the **+** Button on the top left (see ApplePay Developer - Certificates, Identifiers & Profiles)
* Select **Merchant IDs** , then select **Continue** (see ApplePay Developer - Identifiers)
* Enter the **Merchant description** and **Identifier name** , then select **Save** — It is advised to choose the identifier as reverse of the domain where you will provide your ApplePay button (see ApplePay Developer - Merchant ID configuration)
* Review the settings and select **Register**
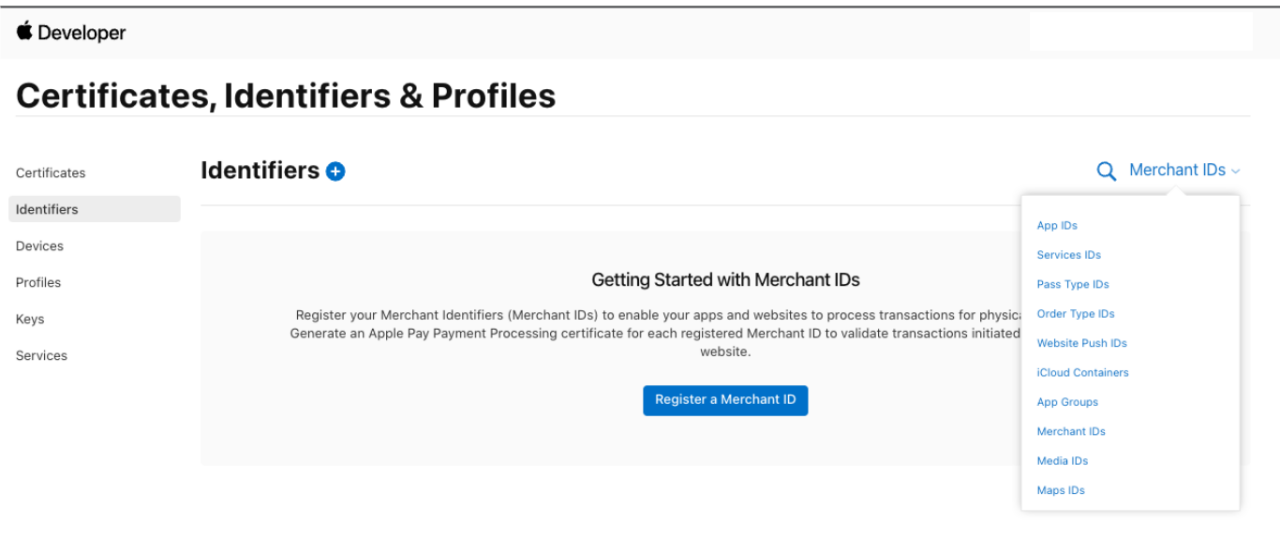ApplePay Developer - Certificates, Identifiers & Profiles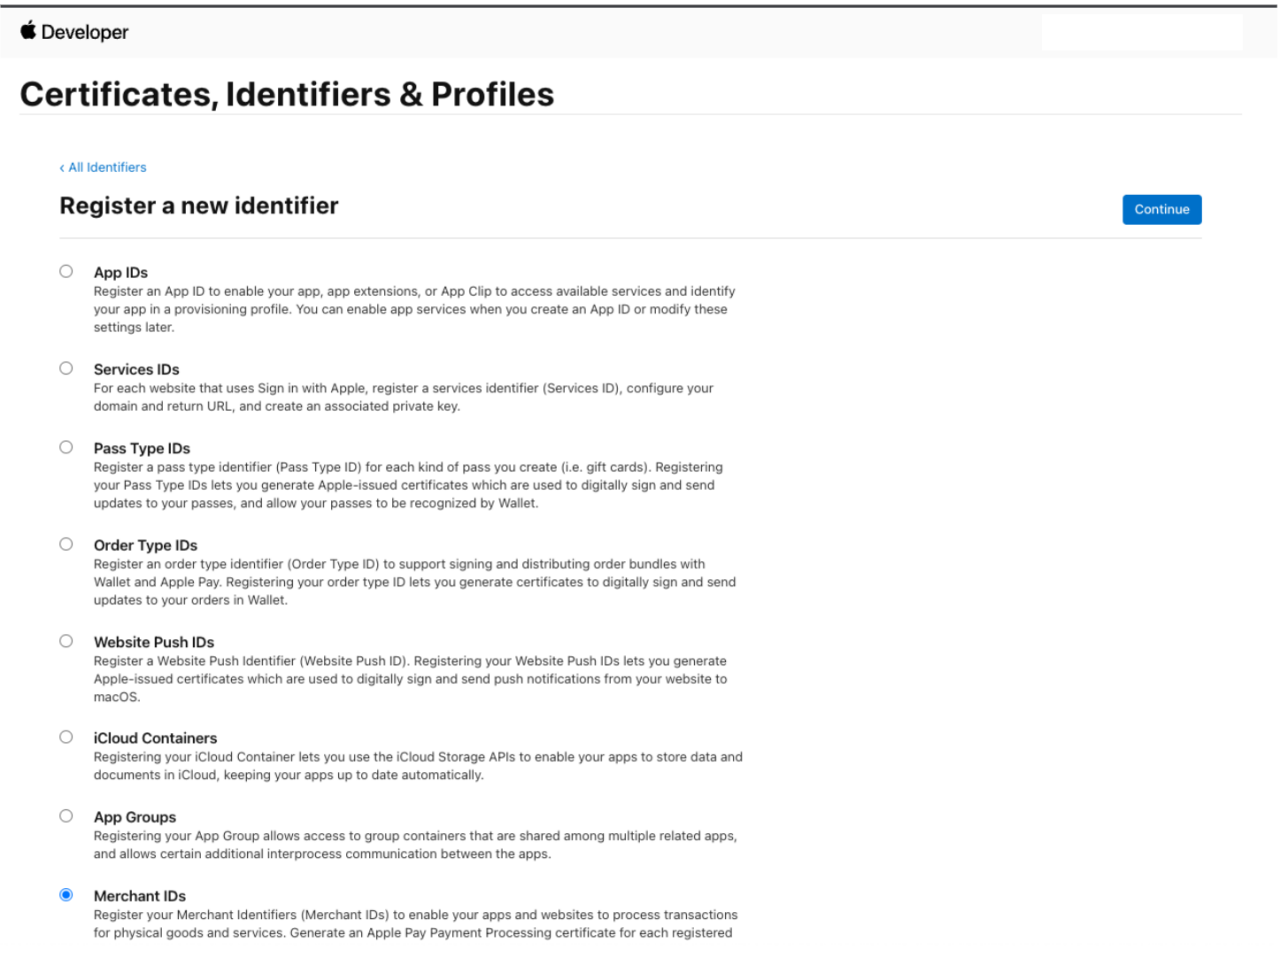ApplePay Developer - Identifiers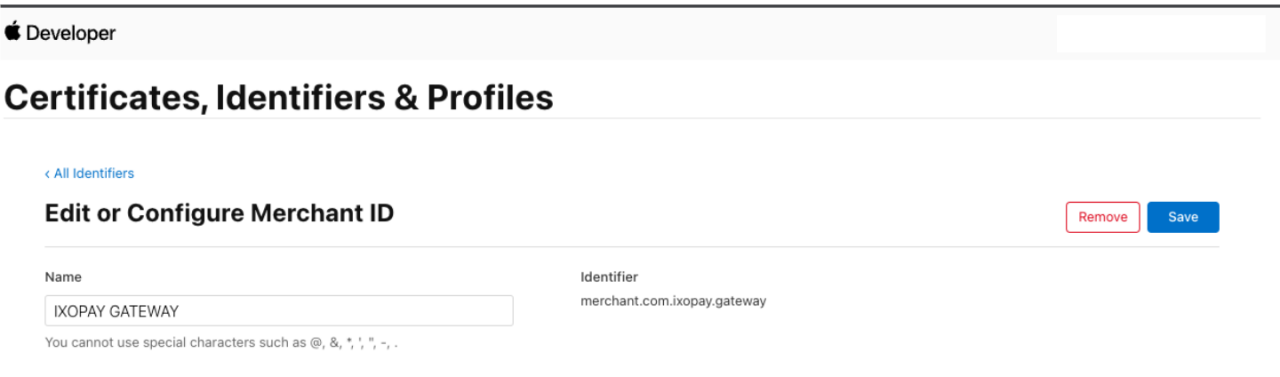ApplePay Developer - Merchant ID configuration
### Create a payment processing certificate
A payment processing certificate is associated with your merchant identifier and used to encrypt payment information.
* In **Certificates, Identifiers & Profiles**, click **Identifiers** in the sidebar, select **Merchant IDs** using the filter on the top right. (see ApplePay Developer - Certificates, Identifiers & Profiles II)
* Select your created **Merchant ID**
* Under **Apple Pay Payment Processing Certificate** , select **Create Certificate** (see ApplePay Developer - Merchant ID configuration II)
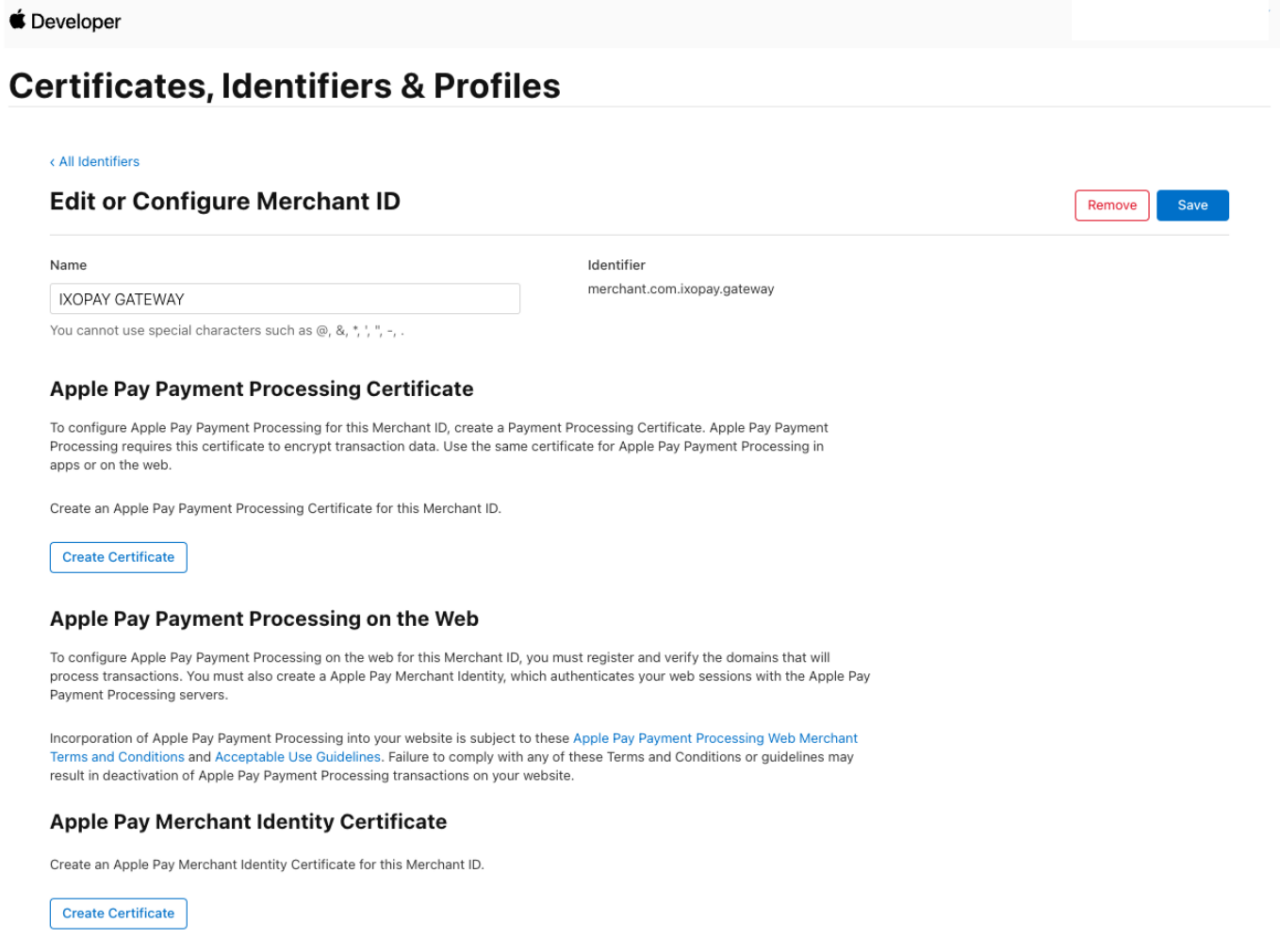ApplePay Developer - Certificates, Identifiers & Profiles II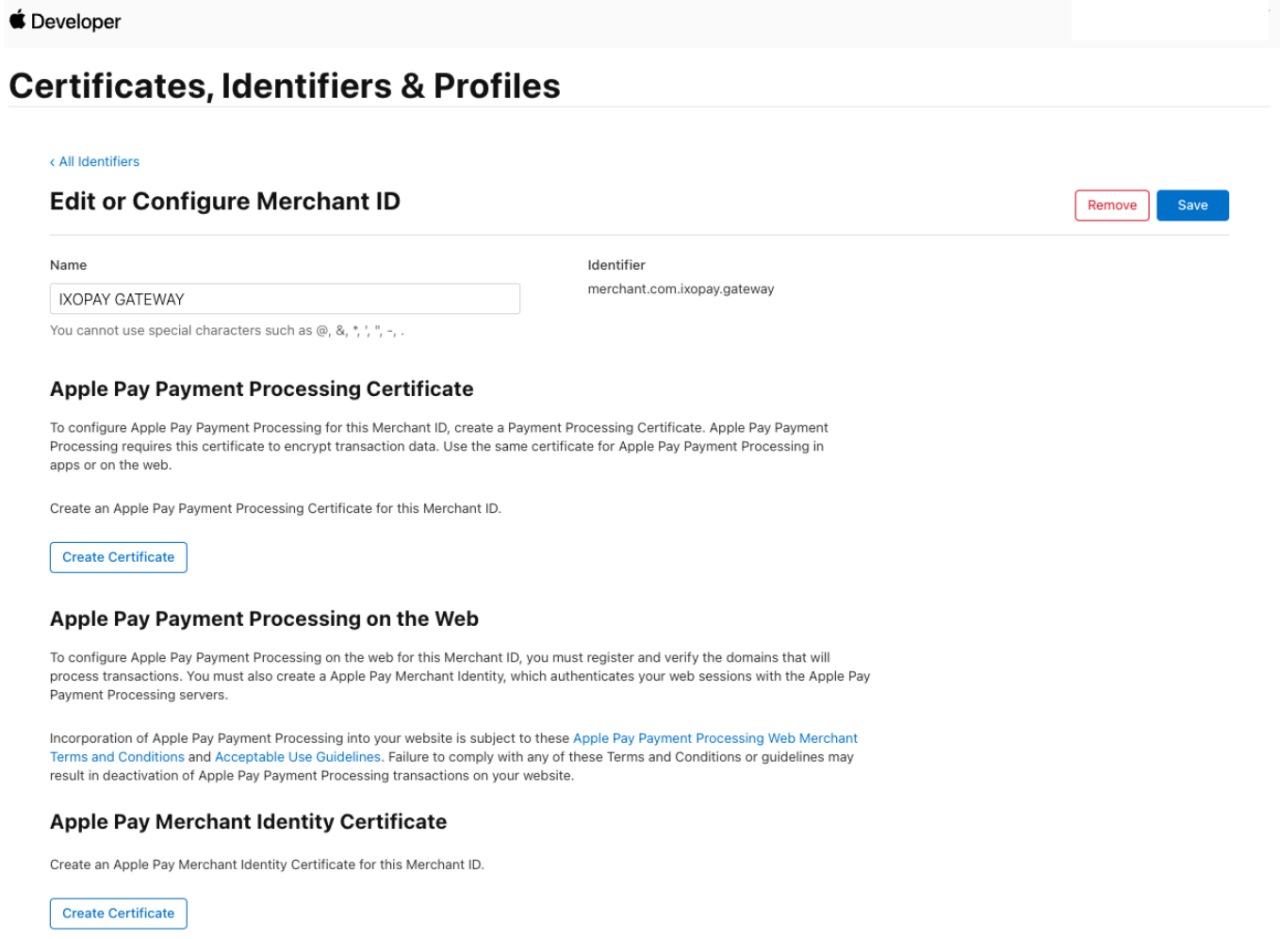see ApplePay Developer - Merchant ID configuration II
> **Info**
>
> The payment processing certificate expires every 25 months. If the certificate is revoked, you **have to** recreate it.
> **Note**
>
> If a banner appears at the top of the page saying that you need to accept an agreement, select the Review Agreement button and follow the instructions before continuing.
* Create a certificate signing request on your Mac, then select **Continue**
* Via **Apple Certificate Wizard** : Follow the official Apple Pay instructions here [https://developer.apple.com/help/account/create-certificates/create-a-certificate-signing-request](https://developer.apple.com/help/account/create-certificates/create-a-certificate-signing-request). A file with a .certSigningRequest file extension is needed.
* Via **CLI** : less complicated way as you get the private key directly and don’t need to extract it. Replace the values for YOURCOMPANYNAME and YOURCOMPANYCOUNTRYALPHA2 (see CLI - Command I & II). Use the certificateSigningRequest.csr file for next step.
* Select **Choose File** and select the certificate request file in the appearing dialog, then select **Choose** (see ApplePay Developer - Upload)
* Select **Continue** then **Download** (see ApplePay Developer - Download), the certificate file (file with a .cer file extension) will appear in your **Downloads** folder.
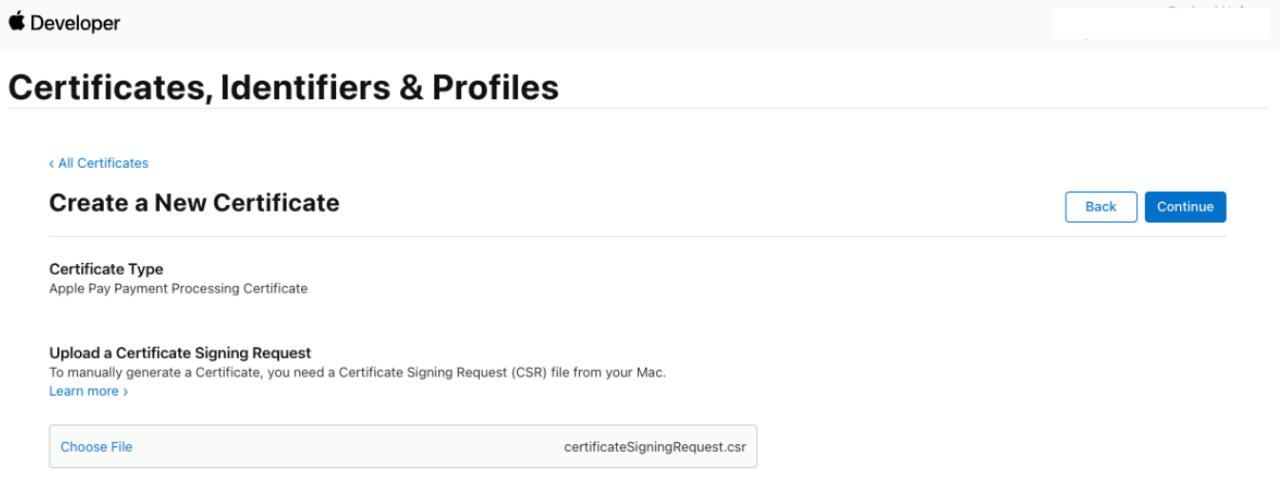ApplePay Developer - Upload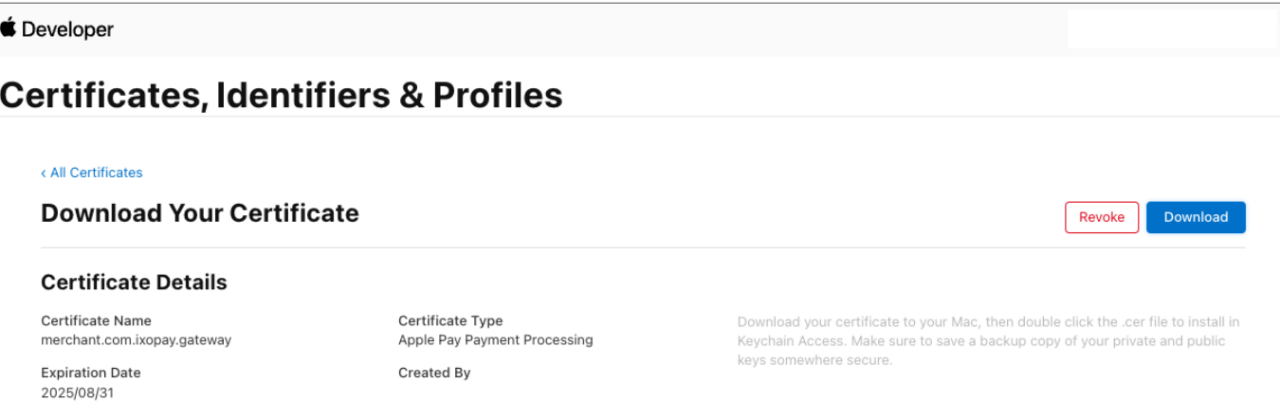ApplePay Developer - Download
* CLI — Command I
* CLI — Command II (example)
```bash
openssl ecparam -name prime256v1 -genkey -noout -out privateKey.key
openssl req -new -key privateKey.key -out certificateSigningRequest.csr \
-subj '/O=YOURCOMPANYNAME/C=YOURCOMPANYCOUNTRYALPHA2'
```
```bash
openssl ecparam -name prime256v1 -genkey -noout -out privateKey.key
openssl req -new -key privateKey.key -out certificateSigningRequest.csr \
-subj '/O=IXOPAY/C=AT'
```
### Register a merchant domain
* In **Certificates, Identifiers & Profiles**, click **Identifiers** in the sidebar, select **Merchant IDs** using the filter on the top right. (see ApplePay Developer - Certificates, Identifiers & Profiles II)
* Select your created **Merchant ID**
* Under **Merchant Domains** , select **Add Domain** (see ApplePay Developer - Merchant ID configuration III)
* Fill in the fully qualified **domain name** , then select **Save** (see ApplePay Developer - Domain configuration)
* Select **Download** , store the downloaded file in the specified location, then select **Verify** (see ApplePay Developer - Domain Verification)
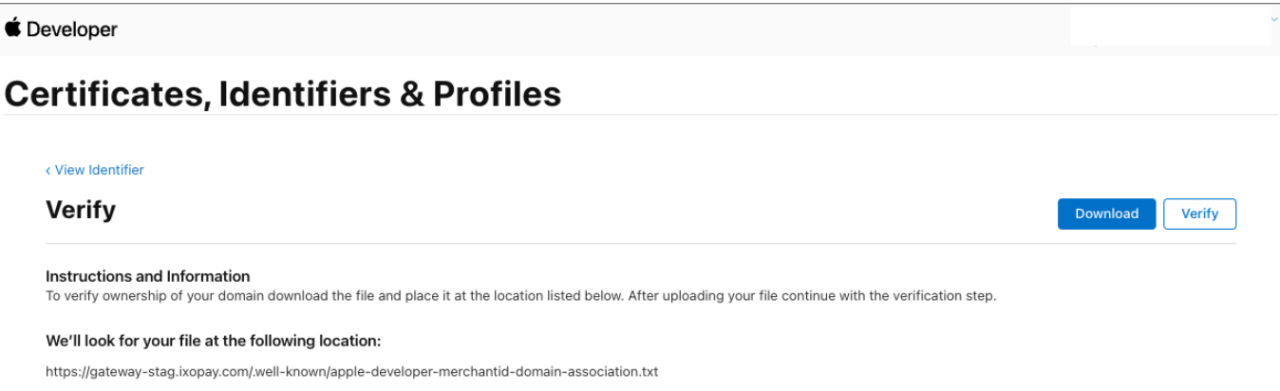ApplePay Developer - Merchant ID configuration III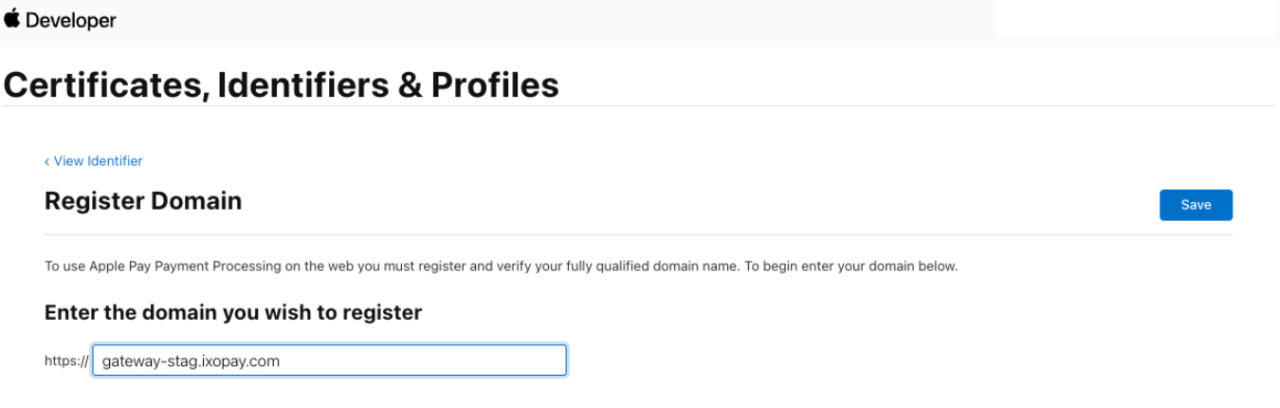ApplePay Developer - Domain configuration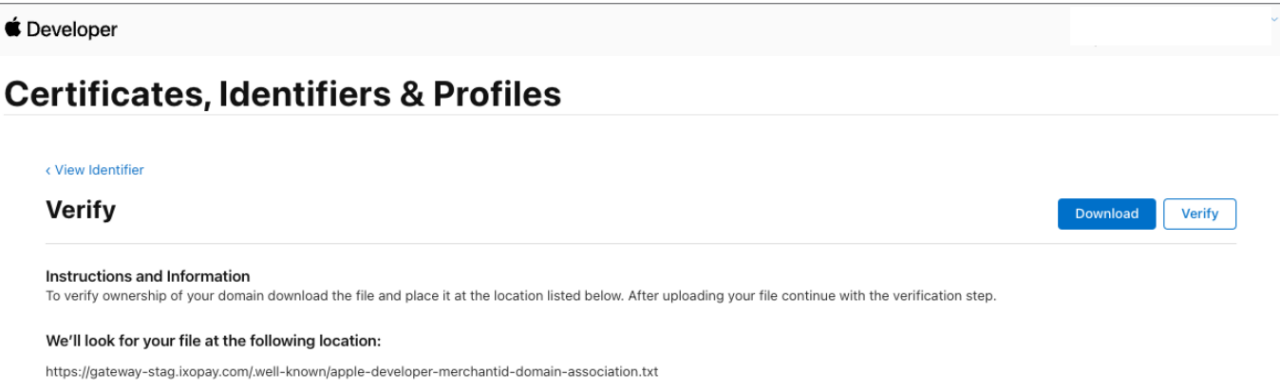ApplePay Developer - Domain Verification
> **Info**
>
> If you are using our Hosted Payment Pages to display the ApplePay button please provide the file to your Customer Success Manager or our Support Team in the [IXOPAY Customer Experience Portal](https://ixopay.my.site.com/support), we will place the file in the displayed location for you.
> If you are displaying our Hosted Payment Page in an iframe, include `https://gateway.ixopay.com/js/payment/applepay_hosted.js` in the page containing the iframe (include it from our sandbox domain or your own IXOPAY subdomain if applicable). You will also need to verify the domain of the container site with Apple. Follow the above steps, but host the resulting .txt file on your own server.
>
> Even though we recommend using native ApplePay buttons in apps, it is possible to display the Hosted Payment Page in a WebView. In this case, add your merchant id to your app profile, as domain verification does not apply to apps.
### Create a merchant identity certificate
* In **Certificates, Identifiers & Profiles**, click **Identifiers** in the sidebar, select **Merchant IDs** using the filter on the top right. (see ApplePay Developer - Certificates, Identifiers & Profiles II)
* Select your created **Merchant ID**
* Under **Apple Pay Merchant Identity Certificate** , select **Create Certificate** (see ApplePay Developer - Merchant Identity Certificate)
* Create a certificate signing request on your Mac, then select **Continue**.
* Via **Apple Certificate Wizard** : Follow the official Apple Pay instructions here [https://developer.apple.com/help/account/create-certificates/create-a-certificate-signing-reques](https://developer.apple.com/help/account/create-certificates/create-a-certificate-signing-reques). A file with a `.certSigningRequest` file extension is needed
* Via **CLI** : less complicated way as you get the private key directly and don’t need to extract it. Replace the values for YOURCOMPANYNAME and YOURCOMPANYCOUNTRYALPHA2 (see CLI - Command III & IV). Use the `certificateSigningRequest.csr` file for next step.
* Select **Choose File** and select the certificate request file in the appearing dialog, then select **Choose** (see ApplePay Developer - Upload II)
* Select **Continue** then **Download** , the certificate file (file with a .cer file extension) will appear in your **Downloads** folder.
* Convert the **merchant\_id.cer** to a **.pem** file (see convert certificate format)
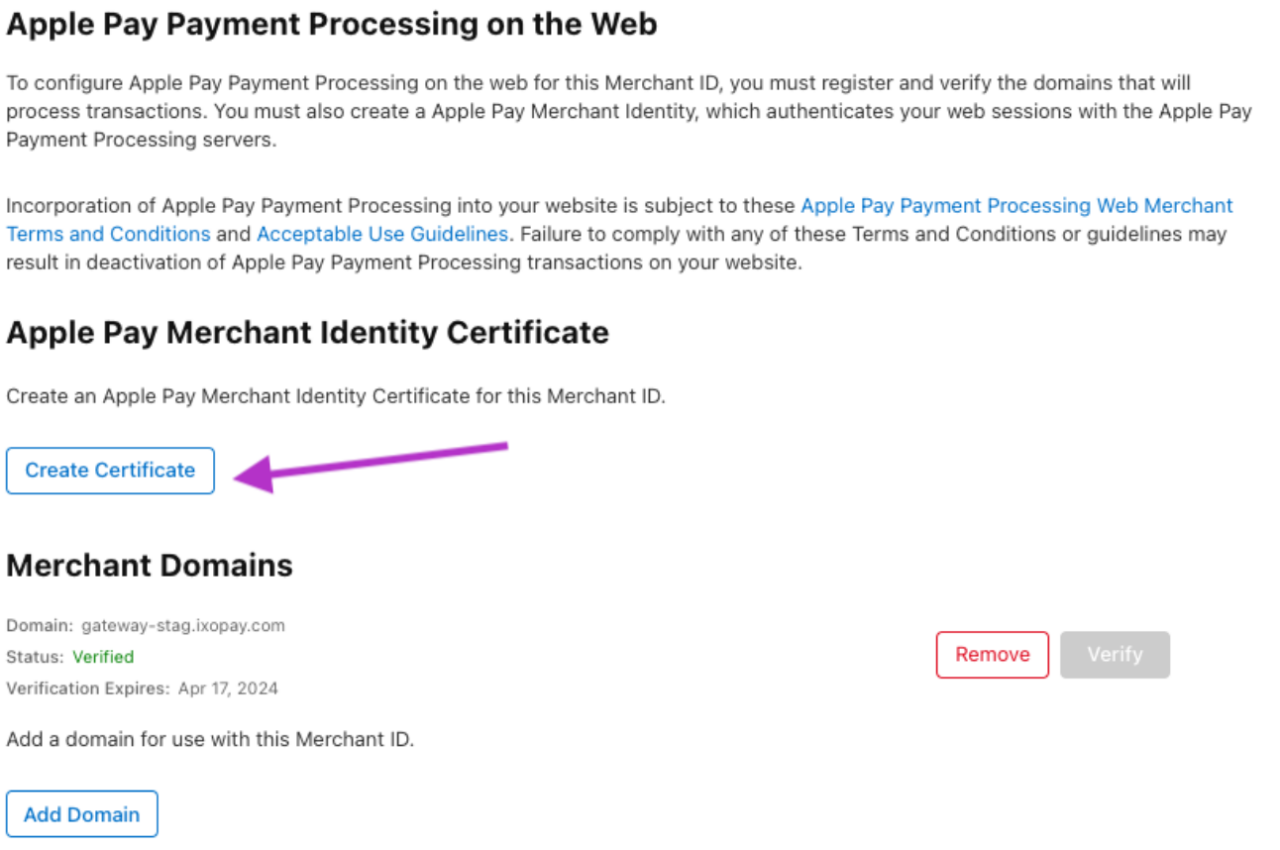ApplePay Developer - Merchant Identity Certificate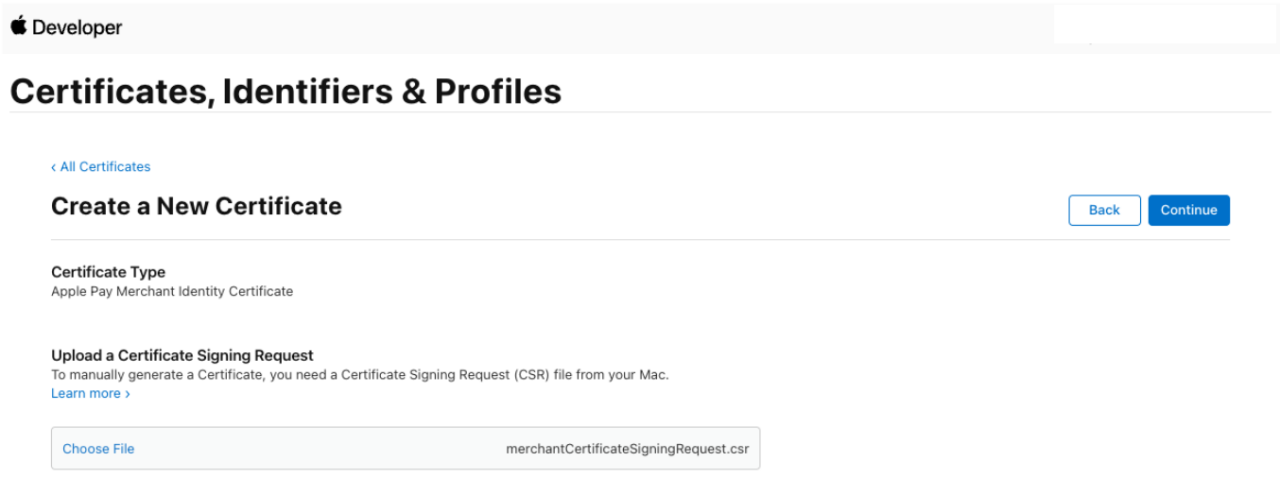ApplePay Developer - Upload II
* CLI — Command III
* CLI — Command IV (example)
```bash
openssl genrsa -out merchantPrivateKey.key 2048
openssl req -new -key merchantPrivateKey.key -out merchantCertificateSigningRequest.csr \
-subj '/O=YOURCOMPANYNAME/C=YOURCOMPANYCOUNTRYALPHA2'
```
```bash
openssl genrsa -out merchantPrivateKey.key 2048
openssl req -new -key merchantPrivateKey.key -out merchantCertificateSigningRequest.csr \
-subj '/O=IXOPAY/C=AT'
```
Convert certificate format
```bash
openssl x509 -inform der -in merchant_id.cer -out merchant_id.pem
```
> **Tip**
>
> Note that the creation of this privateKey and CSR is different to the “payment processing certificate”.
### Create a Apple Sandbox Test Account
1. Create an ApplePay Sandbox Tester (apple ID only for testing) (see Sandbox Account)
2. Add the AppleID to one of your Apple Devices
3. Add Apple Test Cards to the Wallet of this Apple ID. You can find the Test Cards here: [https://developer.apple.com/apple-pay/sandbox-testing/](https://developer.apple.com/apple-pay/sandbox-testing/)
Test your Apple Pay integration with this test account and check your Token has the correct format.
Example ApplePay “transactionToken” for the transaction payload (using payment.js - no HPP):
Sandbox Account
Short form
```json5
{
// ...
transactionToken: "applepay:{YOURTOKEN}",
// ...
}
```
Long form
```json5
{
// ...
transactionToken: 'applepay:{"token":{"paymentData":{"data":"mYd5Oo2cefxSqQo6Z4Nj7OFLh50HkW9mB7esTf6oZo4Gt1pzLHmGXSrm4rd4OGUSetDlBnieesdfadfJ96RUWtymK3cyxqSRufMelUV6g746dtus5SeqFBMVN957boP0s6CyzqSlZRqpwUtsW65NmlvGi2XGgIPLqmEY4P4tFRsdxqv\/RfgGrt\/DcfcvNRO12asdfasdfa231328zU4zxzkSK5wF2cTcCG1s4Rs1XzPfeKlrZpKSf94zKmJ7ztoCpZHxgi47rEPxINvI0SPuK+evusrfy0HMR4qpY3faG\/+fkpBBDLP3No+EoFTRGwt1Yt9n7Cu0fEs3X\/k\/+h7YH4KZGmp9pTwQD+V2BC6MaFDrRlfaOymJT9qJKD6uJ1p1l882LJtfWDD9wmLvZjORdyA==","signature":"MIAGCSqGSIb3DQEHAqCAMIACAQExDTALBglghkgBZQMEAgEwgAYJKoZIhvcNAQcBAACggDCCA+MwggOIoAMCAQICCEwwQUlRnVQ2MAoGCCqGSM49BAMCMHoxLjAsBgNVBAMMJUFwcGxlIEFwcGxpY2F0aW9uIEludGVncmF0aW9uIENBIC0gRzMxJjAkBgNVBAsMHUFwcGxlIENlcnRpZmljYXRpb24gQXV0aG9yaXR5MRMwEQYDVQQKDApBcHBsZSBJbmMuMQswCQYDVQQGEwJVUzAeFw0xOTA1MTgASDFGBSDFSDFASTAjBgNVBAMMHGVjYy1zbXAtYnJva2VyLXNpZ25fVUM0LVBST0QxFDASBgNVBAsMC2lPUyBTeXN0ZW1zMRMwEQYDVQQKDApBcHBsZSBJbmMuMQswCQYDVQQGEwJVUzBZMBMGByqGSM49AgEGCCqGSM49AwEHA0IABMIVd+3r1seyIY9o3XCQoSGNx7C9bywoPYRgldlK9KVBG4NCDtgR80B+gzMfHFTD9+syINa61dTv9JKJiT58DxOjggIRMIICDTAMBgNVHRMBAf8EAjAAMB8GA1UdIwQYMBaAFCPyScRPk+TvJ+bE9ihsP6K7\/S5LMEUGCCsGAQUFBwEBBDkwNzA1BggrBgEFBQcwAYYpaHR0cDovL29jc3AuYXBwbGUuY29tL29jc3AwNC1hcHBsZWFpY2EzMDIwggEdBgNVHSAEggEUMIIBEDCCAQwGCSqGSIb3Y2QFATCB\/jCBwwYIKwYBBQUHAgIwgbYMgbNSZWxpYW5jZSBvbiB0aGlzIGNlcnRpZmljYXRlIGJ5IGFueSBwYXJ0eSBhc3N1bWVzIGFjY2VwdGFuY2Ugb2YgdGhlIHRoZW4gYXBwbGljYWJsZSBzdGFuZGFyZCB0ZXJtcyBhbmQgY29uZGl0aW9ucyBvZiB1c2UsIGNlcnRpZmljYXRlIHBvbGljeSBhbmQgY2VydGlmaWNhdGlvbiBwcmFjdGljZSBzdGF0ZW1lbnRzLjA2BggrBgEFBQcCARYqaHR0cDovL3d3dy5hcHBsZS5jb20vY2VydGlmaWNhdGVhdXRob3JpdHkvMDQGA1UdHwQtMCswKaAnoCWGI2h0dHA6Ly9jcmwuYXBwbGUuY29tL2FwcGxlYWljYTMuY3JsMB0GA1UdDgQWBBSUV9tv1XSBhomJdi9+V4UH55tYJDAOBgNVHQ8BAf8EBAMCB4AwDwYJKoZIhvdjZAYdBAIFADAKBggqhkjOPQQDAgNJADBGAiEAvglXH+ceHnNbVeWvrLTHL+tEXzAYUiLHJRACth69b1UCIQDRizUKXdbdbrF0YDWxHrLOh8+j5q9svYOAiQ3ILN2qYzCCAu4wggJ1oAMCAQICCEltL786mNqXMAoGCCqGSM49BAMCMGcxGzAZBgNVBAMMEkFwcGxlIFJvb3QgQ0EgLSBHMzEmMCQGA1UECwwdQXBwbGUgQ2VydGlmaWNhdGlvbiBBdXRob3JpdHkxEzARBgNVBAoMCkFwcGxlIEluYy4xCzAJBgNVBAYTAlVTMB4XDTE0MDUwNjIzNDYzMFoXDTI5MDUwNjIzNDYzMFowejEuMCwGA1UEAwwlQXBwbGUgQXBwbGljYXRpb24gSW50ZWdyYXRpb24gQ0EgLSBHMzEmMCQGA1UECwwdQXBwbGUgQ2VydGlmaWNhdGlvbiBBdXRob3JpdHkxEzARBgNVBAoMCkFwcGxlIEluYy4xCzAJBgNVBAYTAlVTMFkwEwYHKoZIzj0CAQYIKoZIzj0DAQcDQgAE8BcRhBnXZIXVGl4lgQd26ICi795123123asdfasfaDFgASdfYIKwYBBQUHMAGGKmh0dHA6Ly9vY3NwLmFwcGxlLmNvbS9vY3NwMDQtYXBwbGVyb290Y2FnMzAdBgNVHQ4EFgQUI\/JJxE+T5O8n5sT2KGw\/orv9LkswDwYDVR0TAQH\/BAUwAwEB\/zAfBgNVHSMEGDAWgBS7sN6hWDOImqSKmd6+veuv2sskqzA3BgNVHR8EMDAuMCygKqAohiZodHRwOi8vY3JsLmFwcGxlLmNvbS9hcHBsZXJvb3RjYWczLmNybDAOBgNVHQ8BAf8EBAMCAQYwEAYKKoZIhvdjZAYCDgQCBQAwCgYIKoZIzj0EAwIDZwAwZAIwOs9yg1EWmbGG+zXDVspiv\/QX7dkPdU2ijr7xnIFeQreJ+Jj3m1mfmNVBDY+d6cL+AjAyLdVEIbCjBXdsXfM4O5Bn\/Rd8LCFtlk\/GcmmCEm9U+Hp9G5nLmwmJIWEGmQ8Jkh0AADGCAYkwggGFAgEBMIGGMHoxLjAsBgNVBAMMJUFwcGxlIEFwcGxpY2F0aW9uIEludGVncmF0aW9uIENBIC0gRzMxJjAkBgNVBAsMHUFwcGxlIENlcnRpZmljYXRpb24gQXV0aG9yaXR5MRMwEQYDVQQKDApBcHBsZSBJbmMuMQswCQYDVQQGEwJVUwIITDBBSVGdVDYwCwYJYIZIAWUDBAIBoIGTMBgGCSqGSIb3DQEJAzELBgkqhkiG9w0BBwEwHAYJKoZIhvcNAQkFMQ8XDTIzMDgwMzEyMzIzMlowKAYJKoZIhvcNAQk0MRswGTALBglghkgBZQMEAgGhCgYIKoZIzj0EAwIwLwYJKoZIhvcNAQkEMSIEIJHjEUt3D3kVbh2c4oGoYvsadfsadfDASDFADF8cxAzsMAoGCCqGSM49BAMCBEgwRgIhAJ1a13ITgNDXpg3JciNzbLvqXbxYfeph9yR4RLXJRuiSAiEAhq9M7DYVeYZw+hKUct5dAS7PHy+pa9Y9gxBAq+10D1sAAAAAAAA=","header":{"publicKeyHash":"Nl+banL5XgejSWXhPNuncDYkTOAEZmGYZvUfbb4bOko=","ephemeralPublicKey":"MFkwEwYHKoZIzj0CAQYIKoZIzj0DAQcDQgAEvqH9aA84DGT2nk59fSDHhcYYlFEETc5Ep1KwcYPG6h97jnLnuQhoZS5349mxJBteWDKJocAcQbP\/3\/Oqa0AThw==","transactionId":"eb3b94ed7f650d8123d81ab57ecb2f2123448f3cef48e449e3aeb90d8240a24d"},"version":"EC_v1"},"paymentMethod":{"displayName":"Visa 0326","network":"Visa","type":"debit"},"transactionIdentifier":"eb3b94ed7f650d8123d81ab57ecb2f2123448f3cef48e449e3aeb90d8240a24d"}}',
// ...
}
```